Betsy's Build

Took Betsy out to Uwharrie this weekend for the first test run. Everything worked great- other than my tires that won't seal on the bead....even with staun's. Not sure what is going on. Taking them apart tonight to investigate. Other than that, had a blast.
221810169310 (1).jpg


960810169310.jpg
 
The single chamber Flowmaster muffler had a horrible drone so I swapped it out for a Hushpower muffler....It isn't any better. I need to figure out how to get rid of the drone. It is annoying. Any input is appreciated.
20120514_01.jpg
 
Last edited:
http://www.speedwaymotors.com/3-1-2-Stainless-Steel-Supertrapp-Muffler,36840.html
I've had great luck with these, but unfortunately they are getting hard to find. Speedway motors used to carry them in a ton of sizes and finishes. I guess Supertrapp has wuit making them or something. I see they still have this one available but it appears to be the only one they still carry. They're tuneable and have a pretty decent sound. Should cut down on the drone you're getting by a good bit. I've installed a few and have had no complaints from guys that daily drive them.

Thanks for the suggestion. I have not heard of that type of muffler before. Looks like a good compact design.

Thanks to everyone about the compliments of the stance of the jeep. I really like the way it turned out. Having the constraints of 40" tires, 6" of uptravel and fitting it in the garage made it be the way that it is.

Last week, I adjusted the pressures in the ORIs some more. This past weekend, I took the jeep for its second test run at Uwharrie and it is able to handle the woops a lot better. I will probably tweak them a little more later. They are good to go for our trip to Rausch Creek in a couple weeks- can't wait. The transmission got a little too warm this weekend- 220 degrees at the highest. A transmission cooler/fan combo should be here on Wednesday.
 
I finally put the soft top up on the jeep and drove it slowly into the garage. This was the moment of truth- did all of my measurement work out correctly....to allow the jeep to fit in the garage with the soft top up.

2012-05-21_12-40-18_13.jpg


IT FITS!!! There is about 1.5" of clearance. I have about 0.5" that I still need to raise the ORI's so it is as I planned- roughly 1" of clearance for the soft top.

Working on last minute things to get the jeep prepped for Rausch Creek this weekend. I installed a new transmission cooler/fan combo. Install went smoothly. I have not been able to truly test the fan. I drove the jeep hard around town but could not get the transmission temp above 160. The fan does not kick on until 175. I already know that this radiator is better because I was able to get the tranny to 180 in town no problem. I am sure I will get to test the fan this weekend.
 
Off topic but unless your trolley is all thway back against the opener, you could adjust your run duration on the "up" and probably get another inch of clearance out of that garage door. I was able to do this on my door so that I no longer had to pull the release and push the door up farther to get the truck in and out.
 
Went to Rausch Creek this past weekend. We had a blast. The jeep worked awesome. A couple issues arose that I knew might be an issue- the tires are old and abused. On the first day, I managed to cut a sidewall on one of them. On the second day, I broke off the valve stem of another tire. So, I have aluminum rock rings on order and new tires are in the near future.

Patch job to get off the trail.
Rausch4.jpg


Posing on Crawl Daddy (just before I cut the tire).
Rausch1.jpg


In the middle of rock creek. I need to adjust the ORI's a little to let them soak up the bumps a little smoother.
Rausch2.jpg


Group shot in the rock creek.
Rausch3.jpg
 
I had a small coolant leak that was getting worse. I had already installed the water pump twice- once with a new gasket and once with RTV gasket maker. I finally figured out that coolant was leaking through the bearing in the water pump. Yesterday, I installed a new water pump. Working on a tall jeep is a pain so I let the air out of the ORIs to make the job easier. I wanted to mess with the pressures anyway so it was a good time to bleed them out.
20120715_1.jpg

The job went smoothly. I drove it last night and today and no coolant is visible anywhere.

The exhaust had a terrible drone to it. So, I got some madrel bent exhaust tubing to run a tail pipe further back- snake it over the upper control arm at full compression and have it dump out just past the rear axle.

Here is the finished product made of 5 pieces of tubing welded together. Definitely not my best work but in one area there is only 1/4" of room to fit the exhaust.

20120715_2.jpg


Here it is clamped to the muffler looking toward the rear of the jeep. (the exhaust use to just dump out just after the muffler.) It runs along the upper control arm. The suspension is at full compression in these pics.
20120715_3.jpg


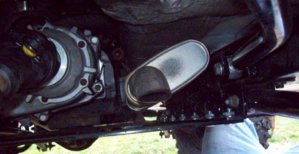
Here is a closeup of the tubing going up and over the upper control arm.
20120715_4.jpg


Here is a shot of the end. It dumps just past the rear axle.
20120715_5.jpg


The jeep sounds much better now. The drone is no where near as bad at it was. The rear floor gets hot from the exhaust. I need to find a way to keep the floor from getting so warm.
 
At KOH several of us picked up some quick disconnect fire extinguisher mounts on the cheap from SWAG Off Road. I finally got around to welding mine up and getting it installed. It is a nice product. It holds the extinguisher tight- does not rattle. However, it is very easy to remove.
2012-07-18_18-41-23_76.jpg
 
Got to one of the final items on my build this weekend- mounted the jeep spare tire on my trailer. I really did not want to put a beadlocked 40" tire on the back of my jeep. That is way too much weight hanging off the back in my opinion- would make for some interesting hill climbs.
So, I mounted the spare on my trailer. I figure that if I get a flat, I will be close to home and can bum a ride to get the spare or just pick up the jeep with my trailer. If I am a ways from home then I will have likely have the trailer. So the spare shouldn't be far from the jeep at any given time. Knock on wood. :)

From the front.
20120722_1.jpg


The bracket that holds it on.
20120722_2.jpg
 
Last edited:
Over the past few weeks I tied the cage in to the frame at the A Hoop and C Hoop. I am not sure how I am going to do the B Hoop.

A Hoop- Ties the front down cage bars to the body, rock rails and into the frame.
20130116_1.jpg


C Hoop- Ties the rear down cage bars into the body and the rear shock buckets.
20130116_2.jpg
 
With the near roll over backwards in Harlan the hood was damaged. Picked up a new hood for a really good deal. Cut the sides to highline it. Need to do a couple more modifications before I can get it painted.

20130122_1.jpg


Safety is definitely more of a concern now-added some diagonal bars behind the seats.
20130122_3.jpg


Also added a lot of gussets to strengthen the front passenger area.
20130122_4.jpg


20130122_5.jpg


In Lions Den the front of my cage got caught on a rock and forced me to back up and go a little different line. So, that would not happen again- I removed the front portion of the cage that attaches to the windshield- all smooth now.
20130122_2.jpg


I made some brackets that attach to the windshield and when folded up bolt to the side of the cage where the A pillar and top bar meet. Much cleaner.
 

Attachments

  • 100_1940.JPG
    100_1940.JPG
    99.6 KB · Views: 358
Baby Hulk- thanks for the heads up on the thrush muffler, great price. I need to tweak my current setup- tail pipe is hitting the floor. It would be easier if I didn't have to have a tail pipe...
 
I had a request for close up pics of how the windshield mounts to the cage.

Here is the bolt that goes through the cage.
20130127_1.jpg


Here is the inside of the mount- tab is bolted to the windshield frame and the cage.
20130127_2.jpg


Here is the mount bolted to the windshield.
20130127_3.jpg
 
Here is the hood after the damage in Harlan. It is officially my "Rock Crawlin Hood".

20130202_1.jpg


Thanks to scotty6336 I have a new painted hood. It is my "Mall Crawlin Hood".
20130202_2.jpg


To easily swap between the two hoods I installed some pins in the hinges.
20130202_3.jpg
 
Back
Top