Trying to get it mostly right the first time: A 5.9 and 46RE swapped Tummy Tucked Daily Driven Jeep TJ

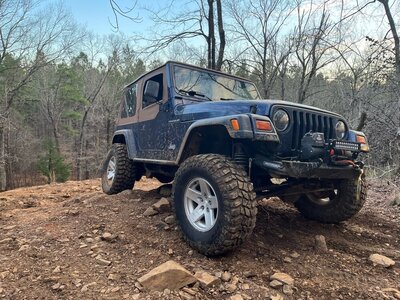
Next up was to start installing the front clip to allow progress on the wiring and plumbing. The goal was to hear it run, so I installed the passenger fender and front grill, leaving the driver fender off to ease of access to that side of the engine bay if needed. The last 10% of a project takes 90% of the time and that has been no different here.

0118cda0c7f1da486bfd30290759c0a95ab17d28bf.jpg


An engine needs 3 things to run: fuel, air and spark. To get the spark, the wiring harness, PDC and battery were installed and plugged in for testing and all new 4GA marine grade wire was run to the starter, PDC, engine ground and chassis ground. I build all my battery cables with marine grade wire with tinned lugs that are crimped (not soldered) on, with marine grade heat shrink on top of that, all protected with split loom and held on with heat shrink at either end. Additionally, all new spark plugs, plug wires, and coil were installed. The accessory drive was re-installed, as well as the throttle body to provide the air.

This left fuel delivery. I’d saved the fuel line from the Durango since I’d read that it was a plug and play – I found this to be incorrect for Durangos. Instead of trying to track down an OEM hose, I opted to purchase an Evil Energy AN-6 hose kit to plumb the fuel line (and will later use this for the transmission cooler). The kit has great reviews and is very well priced so I opted to give it a try.
The new fuel line was assembled and installed, so now we had fuel. And of course I had to see if this garbage ran. With the transmission in park, fresh oil in the motor and a few quarts of ATF I turned the key and was greeted with no gauges, but the starter did turn over. I pulled the harness and corrected a 5V supply wiring error. With the harness reinstalled, the gauges now worked and I cycled the key a few times to prime the fuel rails. As a note, the TJ only runs the fuel pump for 3 seconds until the engine is running. No leaks. I turned the key to start

And it fired right up.

It was alive, though only for a split second before shutting itself off. I’d read and assumed the Durango ECU would give me an issue, either from SKIM or triggering the security feature (yes, those are different features) from the lack of a BCM. I was greeted with a transmission code and an EVAP related code, so I had communication with the ECU… I’ll call that a win. Since I had another ECU from a 99 Ram that I’d hoped was SKIM free, I moved on to installing the cooling system and transmission cooler to allow the engine to run for a bit longer.

This is where this project starts to put up a fight.
 
I purchased 2 finishing clamps (LINK) and used the leftover AN hose to plumb the transmission cooler. The transmission has a ¼” NPT fitting that I needed to adapt to AN-6 – Summit Racing had the adapter I needed for this (LINK). I used 2 45 degree fittings from the kit to come off the transmission and routed the hoses along the driver side frame rail and up to the barbs on the cooler. I’ll try to get some pictures of this – it’s difficult to photograph once installed.

The power steering cooler was plumbed in using hose from the transmission cooler kit. This was as simple as removing the return hose and routing the new hose.

The AC condenser was re-installed and then the Summit Racing radiator. And here’s where the issues come up. After a few nights of research and trips to the parts store:

  • Motor mounts installed in the AA recommended location do allow the use of stock exhaust manifolds. This saves a lot of time and cost being able to re-use stock parts.
  • I have less than 2.5" from the threaded fan mount of the water pump pulley to the condenser- there's not a combination that I've found to be that narrow and I've looked at both electric and mechanical. With a V6 Dakota fan clutch installed, I have 2.5” from it to the condenser, only slightly more room than a stock radiator. Proform advertises a Slim Fit radiator and fan combo that would fit, but there is alarmingly little information and forum chatter about it and its $700.
01ae90c408cd7fdbf3acd0d41cfc495e3494fd43fc.jpg

  • Very few V8 swap radiators on eBay have provisions to mount a shroud or electric fan. You'll have to pony up and pay for a quality radiator to get those mounts or run an upgraded stock replacement. These guys are local to me and have a great reputation: Jeep Radiators | C, G, & J Inc
  • Additionally, many V8 swap radiators flip the inlet and outlet as compared to the stock TJ setup. In doing so, the radiator outlet is halfway covered by the AC compressor with little room to make the turn. This is not unique to Summit - any V8 swap radiator with horizontal tanks and a driver side outlet will have this issue. A radiator with either the stock orientation or an LS swap radiator (in/out on the passenger side) would fix this.
01a149d80b14dcd3e5b96393b86ef0e72d34cf1659.jpg


01efaf88bbdb3a25bf3bd4629a2c2ba7440cfa92a1.jpg

  • I've not found hard evidence, but many say that the stock 4.0/2.5 radiator will cool a 5.2 but not a 5.9. A stock replacement upgraded radiator might be adequate to cool the 5.9. I purchased a stock replacement aluminum radiator and am hoping it will adequately cool my 5.9. An oil cooler and hood louvers are my Plan B. Plan C involves a grinder and a lot of re-work.
  • The ZJ fan clutch is the same height as a Durango fan clutch at 3.5" and contacts the lower tank of my aftermarket radiator when I install the radiator. This would make any water pump or radiator replacement a nightmare as the grill shell would have to be unbolted. It does clear a thinner stock (OReilly replacement) OEM radiator.
  • A 1997 Magnum V6 Dakota clutch is 2.97" and allows the lower radiator tank to clear on installation. It still doesn't allow the thicker Summit radiator to fit. This combination does allow a stock 4.0 TJ fan shroud to be attached, but since I have a tummy tuck the fan is no longer centered of the shroud. I could shim the motor if I wanted to make this work, but that will make future work on the accessory drive difficult. From left to right: 99 Durango, V8 ZJ, Dakota.
012538bc8d6b02d9ce2087f000a742431468d4bb29.jpg

  • This leads me back to electric fans and my final solution. My current Mishimoto fan is 3.5" deep and pulls around 1800 CFM. With the aftermarket TJ radiator installed, I only have 2.75" between the water pump pulley and radiator. I found a Spal fan (30101516 ) that's under 2.5" deep and is rated for 1600 CFM.
In short, the AA recommended placement does allow use of stock driveshafts, exhaust manifolds and fan/ radiator but can really limit your cooling system if you need more cooling capacity. You can build an exhaust to fit - you can't make a radiator and fan fit where the space doesn't exist.

With the radiator hoses back in the stock location, my final hose selection for the upper is from a 4.0 ZJ (Dayco PN#71659). The lower is a combination of FLEXIBLE HOSE, STOCK DURANGO HOSE, and an ADAPTER.

We’re almost caught up!
 
Last edited:
I made a to-do list on cardboard to both keep organized and enjoy the satisfaction of crossing things off the list. I had several things started and almost complete, so I wanted to focus on finishing some items.

018e68a5c3d3df6b5a5113ee692915792616c872c6.jpg


One of the items I’d started and not finished was the exhaust, so I decided to get that knocked out. I’d need the O2 sensors for the engine to run properly anyway. I like to build my exhaust to be serviceable and adaptable over time if I choose to swap mufflers and my old design put the catalytic converter behind the crossmember, which would ultimately limit the length my muffler could be. I decided to move the cat in front of the crossmember to allow future changes to the muffler. Here’s an exhaust fab tip – keep your old O2 sensors around for welding in the new bungs. This will help ensure the threads aren’t distorted during welding.

01198c67f35e81815e5e587d1d13b664b198bcdc7d.jpg


Here was the final result:

01bbeebd37213e9b74936a2ccf971015e2ea355bdd.jpg


The muffler is attached with a band clamp on either side. Since my exhaust is 2.5”, I found a Dynomax tailpipe (PN# 54287) that bolted in to the stock locations. And here is a terrible quality picture of the whole system installed in the TJ:

0163d26fb9409b0c3c7c17eb8c7eb189c141c75a50.jpg


I promise to get some better pictures when I can get this on a rack or at least jack stands.

The ECU was swapped out, radiator full of coolant and I was ready to hear the Jeep run – or so I thought. When I went to crank the engine, the starter struggled to spin it over like it was hydro locked. Weird. I pulled the spark plugs and was greeted with coolant pouring out of multiple cylinders.

Yep, curse words were spoken.

Now is when I started to connect the dots from things I noticed during the disassembly of the donor – no thermostat and little to no coolant (can’t remember if it was dry or low). I’m having serious doubts about this motor as a whole at this point.

In a bit of, well, desperation, I pulled the intake and changed gaskets hoping I might have messed up when installing the Hughes plenum kit. Nope. No change. It still leaked live a sieve. I pulled out my inspection camera (which if you don’t have one in your toolbox, I highly recommend it.) to try to verify where the leak was coming from. Here is what I found:

012ea47f19a37d016371f303de21e1a301b43d311e.jpg


Coming from the top of the cylinder either means I'm assuming I have either a head gasket that failed spectacularly or a severely cracked head, which these Magnums are known for. Due to other obligations and a pending family vacation to Las Vegas, the TJ was put on hold for a few weeks.
 
I’d thought through several different scenarios and fixes, from remanufactured heads to a brand new crate motor – I was all over the place. My preference was the new motor (at $2300), I just had a hard time stomaching that right now. I kept a watch on FB Marketplace just in case and happened up on a deal I couldn’t pass up – a 2wd 99 Ram 1500 with a 90k mile 5.2L and rebuilt transmission. The best part is I got it delivered to work for not much more than the cost of reman’d heads, so in the off chance my 5.9L is an easy fix I can get my money back out of this truck. Nope, its not a 5.9, but at this point I’m not being picky. I won’t know the difference anyway.

019053cb138fc825bd132982ba24df63149a1be821.jpg


01f12fe3d100d63d39c5cd7c2171f18f884c4cc293.jpg


This is the kind of clean you can't fake - it's obvious this truck has been cared for.

0152b5b0131f16e2db83fb2b2a3e2238967e3972f2.jpg


The truck runs flawless (it actually starts with a key!) and gives me confidence this will be a good donor. I’m taking this week to re-organize parts and tool and slam a Wave Runner back together before the holiday weekend for a test drive at the lake. After the 4th, its full bore back on the TJ
 
[*]This leads me back to electric fans and my final solution. My current Mishimoto fan is 3.5" deep and pulls around 1800 CFM. With the aftermarket TJ radiator installed, I only have 2.75" between the water pump pulley and radiator. I found a Spal fan (30101516 ) that's under 2.5" deep and is rated for 1600 CFM.


Is your aftermaket rad so much thicker than the stock one that it kills 2.5"+ of room there ? Seems like you have way more than 5" between rad and water pump pulley here

01ae90c408cd7fdbf3acd0d41cfc495e3494fd43fc-jpg.375834


I can only offer very little help in your endeavor, but when it comes to Spal fans, I've probably touched almost all of them. The one you selected might be too small IMO. 30102082 is really what you want. The CFM rating at 0 static pressure doesn't mean much, but the thin blades of the 30101516 will have a hard time moving air through the cooling stack you have.

I hope I'm wrong, and what you selected is enough, but, just putting it out there.

A solution I've seen done a few times with great success is to cut the grille and sink the cooling stack forward in it. this would free room for a thicker fan.


Now, I must say I'm very impressed by the quality of research of your project and how detailed the recaps are. thank you for sharing this with us.

I found a typo there - that 2.5" is from the condenser to the fan clutch and the Summit radiator is 3" +/- thick.

Noted on the fan info. My fan selection was dictated 100% by the space I had available, so I hope what I have will be adequate. If its not, I might look into hood louvers to help get heat out from the engine bay. A few threads I've read have said the stock TJ radiator will cool a 5.2L but struggle with a 5.9L, so the potential motor swap might be in my favor.

Also, thanks for the complement! I'm glad someone is enjoying this build.
 
Wish i had some old pics and more info, but i used a Taurus fan in my old yj that i swapped a 5.9 in. Pretty sure i just had a cheap aluminum v8 swap rad from radiators.com and it cooled well.
 
Taurus / Volvo fans is badass and will totally do the job. But it's thicker than 2.5"
 
I’ve managed to make some really good progress over the last few weeks (to get back to where I was 2 months ago…)

The first order of business was to free the new engine from the donor truck. A few hours spent on a Friday after work:

01dea5ddb26d392aa0502e73c4068b46345dac5081.jpg


01565089294a8f3f441519d365395a99738923106b.jpg


I bought the truck knowing it had a 5.2L in it, but I was in for a surprise! Check out the casting number on the block!

01a2387dbeb608616af01a8fd591b8c77a8cbbc254.jpg


From here on it was a straight forward deal that I didn’t take many pictures of – old motor out of the Jeep, swap the oil pump, intake and timing chain to the new motor, throw some paint on it and reinstall.

01f6702e721a932bfd527333fdc8cd0b3f03134c38.jpg


I got all that done last week, but did learn something in the process…

5.2s are internally balanced whereas the 5.9Ls are externally balanced via the harmonic balancer and the flex plate - or so I thought. The engine had the correct harmonic balancer but no weighted flywheel. Odd. After research I discovered that prior to 1996 Dodge balanced the 5.9L via the torque converter, not the flex plate. I knew this engine had been changed at some point, so I found the casting date on the block to figure out what year this engine is – survey says 3/1994. That means that I should have had a weighted torque converter but since the truck and transmission is a 1999 it wasn’t weighted. I swapped the flywheel over from the old 5.9 and all was good.

My wife was out of town last weekend, which left me and the dog to work on the Jeep. We’re going to the beach at the end of this month and I’m determined to drive the TJ there – that meant this weekend needed to go well. The new motor was dropped in Friday night after work and hooked up for a test fire by Saturday morning. As a recap, the Jeep had started with the Durango PCM but immediately shut down likely due to SKIM or the Security feature (I’ve learned that there’s a difference between the 2 as well). I swapped in the PCM from the donor Ram, turned the key…

And it runs!

(Without shutting off)

I was both ecstatic and relieved to hear it run, really for the first time. I still have to sort out a P0753, P1764 and P0176 trouble codes but I’m guessing that’s related to a wiring issue with the transmission relay circuit I added. The rest of the day Saturday and part of the day Sunday were spent doing the last 10% of a project that seems to take 90% of your time (and really isn’t that interesting to read about).

I went ahead and ordered a new driveshaft from Adams so I can drive the TJ around with the D35 for now. From my research, the 8.8 with a 1350 adapter flange should allow me to re-use this shaft with the new axle. With the new driveshaft in, the TJ moved under its own power Saturday night.

011f17b1220c3dd3371685be73006b8e4c7afd0e90.jpg


I have 14 days to get this done (enough) to drive 4 hours to the beach. Game on!
 
Welp, my momentum on this project took a big hit. Used transmissions are always a gamble and a rebuild should be carried in your budget for a project like this.

Evidently my transmission rebuild is happening...now. Either the torque converter (which is brand new) or the pump in the transmission wiped itself out after the second test drive around the block, which was confirmed by the nice metallic / pearl color in the transmission fluid. It sucks, but its all part of this hobby and dealing with used parts. The plan now is to start selling and scrapping what I can to pay for the new transmission, keep finishing all the little details (that needed to get done anyway).

I’ve finally taken the time to post some updates to this thread…

I still stand by this previous post that the money for a rebuild should be squirreled away in your project budget, but that doesn’t mean you HAVE to spend that money rebuild the transmission if its not required. My local transmission shop that I have used before was 6-8 weeks out and wanted $1500 +/- for a rebuild and a new unit from Autozone / any online retailer was $2300 and up. Frankly, I didn’t like either of those options.

That’s when I started researching the differences in 46RE overdrive housings - my Ram donor had a supposedly rebuilt transmission (I mean… it drove to the scene of the accident, right?), but it was a 2wd. All my research indicated that the transmission itself was identical between a 2wd and 4wd truck and the only difference is the overdrive housing. I figured it was worth a few hours to pull the pan, inspect the Ram transmission and see if the 4wd OD housing fit.

The PO said this transmission was rebuilt about a year ago and all the signs seemed to confirm that – the date code on the torque converter, socket marks on the pan bolts and the fluid condition. Part of me wishes the transmission was destroyed so the decision was made for me to get a new one, but since I’d (sorta) driven the truck and the internals all checked out I had a decision to make – spend a lot of money and buy new or roll the dice on this used one. I slept on it for a few days and decided to get my monies worth out of my donor truck and go with the used transmission. Fingers crossed this doesn’t bite me later.

I didn’t take many pictures of the swap, but it was fairly straight forward. Remove the old transmission, remove a handful of bolts attaching the OD housing and flush with brake clean (as best I could), flush the cooler and lines with Kooler Kleen, swap the OD housing and reinstall. Easy, right?

019ba6675a6afffa09841baec520c812868ca4fdaf.jpg


If you ever swap OD housings, be sure to keep everything vertical so the clutches and other wizardry inside the transmission don’t get out of alignment.

0135d2621fa405beb0cf7cba12fbfdd2ebb01d15e8.jpg
01b94123cd5d4935f2ac0ae111a14e051da4b6f721.jpg


This was the most interesting part of this ordeal. With the transmission on a jack it wouldn’t fit under the TJ and with no transmission in the Jeep the motor was being held up with an engine hoist and a jack as backup. The only way to get the jeep up high enough was to put a floor jack under the front axle (with a 6x6 block for all the safety), raise that as high as it would go while also raising the engine at the same time.

018ccea5337090f075948f99d4a1e0b699fd4390d4.jpg


The rest of the installation went as planned and I had the old trans out, parts swapped and new unit installed over a weekend. Back to where we were 8 weeks ago.
 
With a little momentum on my side it was time to get this build road worthy. This will be a long post as I got all of this done in about a 2 week span in October working entirely in the dark after work since all of our weekends were tied up.

To quote David Freiburger ‘Don’t get it right, just get it running’ is such an accurate statement with builds like this. I needed the kick in the pants motivation that only comes from getting to actually use a rig… I can wire the light bar, transmission temp gauge and other non essential things later.

First step – a new cardboard to-do list. My pictures also get sparse here because much of this was done in the dark after work and most of it is all stuff that’s well documented elsewhere. The mandatory list included:

  • Fix the transmission code
  • Loom and final install the wiring harness . Protect from melty or spinny things.
  • Install rear upper control arms, bump stops, track bars and rear track bar relocation bracket
  • Install air intake
  • Install coil spring spacers (until proper springs can be ordered).
  • Fix brake light switch
The P0753 Shift Solenoid A transmission code was first on the list. My hunch was something was wired incorrectly on the relay I added so that’s where I started due to the fact that the code remained after swapping out the PCM and transmission. I verified the wiring was correct and started checking resistance across wires to verify I didn’t have any bad connections. The problem ended up being the Transmission Control Relay Output wire had pulled out of the terminal and was not making a connection. I re-crimped a new terminal and boot on and crossed this issue off the list

I also now have an intermittent issue that occurs when I plug in my code reader that the speedometer goes nuts and the reader will no longer will connect. We’ll figure that out when it becomes consistent.

The harness was loomed with stuff I bought off Amazon and taped with 3M Super 33 electrical tape. I tried to copy the same method that Chrysler used that wrapped the wires then wrapped the loom to lock it all into place. I’ll go into more detail in the wiring post once I have that completed.

01b724a6774963b31d80b7ab3913460be2ff0760ce.jpg


The Savvy rear control arms were installed and pinion angle set. As of this post, I have not installed the rear track bar and relocation bracket yet. That should happen within the next week.

I’d originally picked up a ZJ air hat to tie into the stock TJ air box but due to a tab on the throttle body and notches in the hat, it can’t be clocked correctly to point to the TJ air box without modification. For the time being I slapped a parts store cone filter on the ZJ hat.

01c0aa5e6fc974150d4661121187682c7a4ce4775c.jpg


The front Currie track bar was installed and I did run into an issue where the grease zerk interfered with the axle mounting bracket. Some massaging with the die grinder and carbide burr fixed that issue.

Next was to address the front springs and bump stops. The factory bumpers had long since left the chat from dry rot and the Rough Country springs were nowhere near up to the task of keeping the new found weight of the 5.9L suspended. If it’d had bump stops, it would have nearly been sitting on them. I went cheap and reliable for the bump stop setup, which consists of Crown OEM replacement bumpers and 2 hockey pucks per side to keep the tire out of the fender. The final combination on the springs ended up keeping the RC 2.5” springs and adding a 2” spacer to them. Do I recommend this for long term use? Nope. But this combo did give me the correct ride height, provide a surprisingly good ride quality and most importantly got the Jeep on the road.

01d772d1d7964354ddf2427484ea2aba36f8914bf8.jpg


Lastly and pretty importantly was fixing the brake light switch. On the TJs, the throttle, brake and (if equipped) clutch pedal are an assembly that is mounted to the firewall with 4 bolts. Without a doubt the worst part of this build was swapping the pedal assembly from the manual to an automatic setup I ordered off eBay. I pulled the driver seat, laid down some blankets and just made it happen. It was all kind of a blur and I’ve tried to forget the rest of that experience.

If you’ve ever looked at the brake light switch on the TJ, it sits against the brake pedal and is pushed to a normally open state. When the pedal is pushed and takes pressure off the switch, the brake lights come on. I swapped the brake light switch from the manual to automatic pedal assembly and reinstalled it only to find the new pedal stops short of the switch, meaning the switch is always closed and leaves the lights on. The temporarily permanent solution? A zip tie. I cut the tag end off flush with the head of the zip tie and positioned the head to make contact with the switch. It’s not dumb if it works.
 
With the ‘Mandatory’ list completed, a thorough once over and fresh fuel in the tank it was time to drive this rig. The first break in run was to one of our favorite ice cream shops. I was as nervous as I was excited.

01916b744bfed0578d811bf3bca06e1d66de8bb964.jpg


The trips progressively got further away from the house as I gained faith in my newly built contraption. This was the first 40 mile round trip to work.

01f7b94e1e29adff6a0dcf12798c17cff9a9d55bb7.jpg


All the hours spent researching and wrenching on the Jeep have paid off in spades as I’ve put 300+ miles on this build to date with no real issues to speak of. I really think I got this mostly right the first time and I owe that in no small part to all the knowledge on this and numerous other forums. This engine and transmission combo work so well in the TJ this really should have been a factory option as the 5.9L has enough power to make the Jeep nimble and fun to drive, but not stupid or out of control. I still have a lot to finish and I’ve already come up with a lengthy list of things I want to change, but getting to enjoy this build has me more motivated than ever to keep working away at it. Here are my initial thoughts and things to fix:

  • The speedometer is shockingly close to accurate as-is. A Speedohealer might be added at some point to make it perfect. (Probably not)
  • I’m not convinced the fuel gauge is exact yet. I think its reading lower than what’s actually in the tank (which is the better than the alternative).
  • This thing is a BLAST to drive.
  • The exhaust sounds phenomenal, but it hits a brain rattling exhaust note around 2700 RPM. Fine for a trail rig, but not so fun at cruising speeds. The tailpipe is also touching the trailer hitch which will cause a snowball of a project. I have a hitch hauler and a small utility trailer I put behind the TJ fairly often, so I need to retain a hitch of some kind. To change the muffler I really need to ditch the hitch, raise the entire tailpipe up and install a new bumper at the same time.
  • The radiator and fan have had no issues keeping it cool thus far.
  • Current MPG is 9 +/- and should really be better than that. My driving has been… spirited, but not THAT bad.
  • I’m getting some driveline vibrations so the pinion angle must not be perfect.
  • The track bar is rubbing the gas tank skid plate.
  • The oil pressure is reading lower than I’d like at idle.
I’ve ordered some Core4x4 lower control arms to properly set the pinion angle and hopefully give the track bar some clearance. I’m planning to spend a day wrenching on the Jeep I can catch a semi warm day over Christmas.
 
After enduring FB Marketplace for enough weeks it was time for the Dodge to go to the scrap yard. I loaded it onto my new to me trailer and headed to the scrap yard after work. And yes, it’s really convenient having access to reach lifts at work!

012b8f1d0d2c51e662cdfb2c3637f9ae53e468d0cb.jpg


01521a9ed27df7e05cbfd039a77e18ca62461d8abc.jpg


Right before Christmas my wife’s car ended up in the shop for almost 2 weeks due to a failed ECU, which put the TJ into true daily driver status… ready or not. It didn’t develop any new issues and was a joy to drive, although heat sure would have been nice when it hit low teens in Alabama that week.

01b2f3c3b5a16ec14386edfe5c0b6224fbe4b8f46a.jpg


I took the week off between Christmas and New Years and got in a good weather day to work on the Jeep. The to-do list included installing the rear JKS track bar, angled relocation bracket and new lower control arms, all in an effort to correct the rear pinion angle. This project ended up taking most of a day and rendered a few lessons learned.

The first issue came with the shocks hitting the coil buckets due to the pinion being rotated so far up. Nothing a grinder and cutoff wheel can’t fix. (picture taken mid process).

01b1fb1ff11ed177d5e66954ab38815b1b2b8d70bc.jpg


The second issue came with the control arms. Core4x4 offers these in 0-6” and 6”+ lift increments and without much thought I ordered the 0-6” Tier 3 arms. Seemed logical. Except for the fact that the arms didn’t have enough adjustment to pull the lower mounts forward enough to roll the pinion like I needed. This doesn’t have anything to do with the arms – in fact I am very impressed with the fit, finish and quality of them. This has everything to do with me not measuring correctly before and after. To get the pinion somewhat close to correct, the track bar was trying (unsuccessfully, might I add) to coexist with the gas tank again. All of my issues revolved around the tummy tuck and relative lift height of the drivetrain, which will all be resolved when I swap in the 8.8 and can clock the bracketry as needed.

01bc4b2a2a969360285c6a152ad12126014e7af5c3.jpg


01cb9fb6a8276c8bfec2b570827e7c50d61e37ab45.jpg


But I had the rest of the day to fix this issue and an 8.8 swap isn’t an afternoon ordeal. Since I couldn’t rotate the pinon to meet the transfer case, maybe I could drop the transfer case to meet the pinion. If you recall from earlier, the front output shaft of the transfer case was hitting the crossmember and I’d installed a few washers as a quick fix to gain the needed clearance with the intent to remove them and fix this issue properly later. Well, later was now (and fingers crossed this was enough!). I unbolted the transfer case and lowered it until the angle finder read zero. This is how much I needed... about 3 washers worth.

01a9510636762bb6df0c222b6167b797f62349ae2d.jpg


01f8a3c03b58c054e5d5ddbf573e198ebac67e235d.jpg


I removed the crossmember, notched and plated the cut and reinstalled. I re-checked my angles and everything was good to go. The test run was to a local favorite restaurant:

01939df5d960e6643a83cdf6071d5ec9e9baaeb027.jpg


It was 70 in December, so if course we took the top off. It still as a slight vibration at 45mph, but overall much better than it was. We also took the TJ through a drive through Christmas light display in town, which was brilliant considering it was pouring rain and the oil pressure at idle is sub-par.

01795b7b88d441ea86a7559ac3c165ede948f0ecdf.jpg


Total miles so far: 725.
 
Smittybilt make a good affordable bumper that may help your exhaust situation.

 
To get caught up from the past month: January brought some pleasantly warm weather and an invite to go wheeling at Morris Mountain ORV park in Delta, AL. If you’re not familiar with MMORV…


I used this as an opportunity to get my new trailer dialed in with a relocated jack, toolbox, storage rack, tie downs and a winch mount. I’m a bit of a trailer geek and probably enjoy working on or building trailers as much as I do anything else. Out came the grinder and trusty $100 Harbor Freight Vulcan welder.

First was to move the jack forward to allow room for the toolbox and still have room for the tailgate of my truck to lay down.

01426cc42675fec9ffc327719d170ee443e1d887a3.jpg


Next was to weld on 8 d rings to fill in the gaps where the stake pockets don’t quite work for tying down a vehicle.

017dce17199a00c468e46cc92123feea3540b58cb0.jpg


I use my trailers for a lot more than just hauling vehicles and have found a winch and storage to be absolutely invaluable accessories for keeping all the gear I need to drag home new projects. This trailer is no different and got a receiver welded to the front rail for my multi mount winch and a toolbox and storage rack added to the tongue. The rack is designed to carry a gas can and have room for a spare tire but I still haven’t committed to the final design.

0137ba10d45a7e4472be84bed93bbd4f539867e433.jpg


Loaded up.

01e13ffd44dabcab88b634660cf7df0198cf1919b2.jpg


My riding group is all RZRs so I felt like I brought a knife to a tank fight. Luckily, the access roads in this park are great and I was able to follow the group all day.

0197e9100b0a69f9a2601553f56d31d69b2b3e6b6a.jpg


011d20b97a12d2ed263fc24f023edf9a48cb013795.jpg


Since this was my first time wheeling a TJ and the first time I’ve had it out in the woods I absolutely babied it and probably looked like an idiot – but I really didn’t care since I was having a ball.

Obligatory poser shot.

011ca47a19a3a1ef84ac7711236a8223d668e77337.jpg


This brings the thread up to today. The TJ has been getting driven around town really without issue. I’ll get back to wrenching on it once the weather warms up and I have the water toys prepped for the summer. All of the wrenching will be covered here when I get back to it.

Speaking of water toys… remember when I said my trailers get used for a little bit of everything? Yep, I launched a Seadoo on a trailer…off the equipment trailer to retrieve my latest purchase.

014aa61cd8b77aaec282187e64128f02db3992ac03.jpg


01c2c3a63784d6352dab1cade98770b11ff8f6219d.jpg
 

Attachments

  • 0125dd5e5581db2e47452c29f366b35d3c7eae438b.jpg
    0125dd5e5581db2e47452c29f366b35d3c7eae438b.jpg
    285.5 KB · Views: 62
It’s been a minute since I’ve updated this thread, which is largely due to the aforementioned Seadoo project taking on a life of its own and not wrenching on the TJ at all. I ended up buying a total of 5 skis, 2 trailers and a dock and am almost through fixing and selling what I’m not keeping.

The TJ has just over 2k miles on the swap and has had its first real issue that had to be addressed. A few months ago I was out running errands, shifted to reverse to back out of a parking spot and was met with a grinding sound that makes nails on a chalkboard seem pleasant. The best way to describe the sound is like trying to shift a manual trans into gear without using the clutch. Oddly enough, I shifted to drive and the noise went away and the TJ continued to run and drive fine, except for the grinding noise which would occur fairly random. I learned through trial and error that I could shift the transfer case into 4wd when reversing and the grinding went away, so I was confident the transfer case was where my problem lied.

Long story short, the grinding got too frequent for me to ignore so I parked the TJ a few weeks ago until I could diagnose the issue. I pulled the transfer case this weekend and found the fluid to have some super fine metallic color to it, but no large pieces. I had the transfer case sitting on a table with the input shaft facing down and stared disassembling it to find the problem. Disassembly revealed that the gear that engages the planetaries for low range had wear on the face of the gear teeth, like was attempting to engage.

016a12fe54593f7681caba76169d95d7b9083e56d9.jpg


That didn’t really make sense.

What also didn’t make sense was how the shift collar that engages the front output didn’t seem to have the travel to disengage the front drive, which I also knew didn’t add up. I laid the case on its side, grabbed the input shaft and found 1/2” of play front to back.

That’s DEFINITELY not right.

Look at the gap from the snap ring to the bearing:

01c15613fa44273b92581705a32264e1aa51e786e8.jpg


I looked at parts diagrams and confirmed I wasn’t missing a shim, so next was to check the bearing size on the Dodge transfer case (remember, don’t throw ANYTHING away until you’ve been done with this swap for a while!) and sure enough:

016895a91b966882c977d8350e7281b42fa0620168.jpg


Found it. I’d swapped the input shaft and hadn’t verified that the bearing was the same which was causing the input shaft and planetaries to shift front to back. I reassembled the case using the Dodge front half and reinstalled the transfer case with no issues. A rigorous test drive will be conducted this evening in the form of an ice cream run, likely for Bruster’s Southern Banana Puddin’.

The TJ is on deck to make a drive to the beach in September, so the push is about to be on get it road trip ready. If that trip goes well, the next outing will be a road trip in October to Ashville, NC then to Knoxville, to Nashville then back home. There should be a day of wheeling at Windrock in there somewhere, so this trip will be my goal to get the TJ completed (well, as ‘done’ as a jeep ever gets, right?)
 
I’ve gotten a few days to wrench on the TJ in the past weeks and have gotten several things knocked off the list.

First up on the list was to replace the current Magnaflow 12866 with the newer and much larger 12276. I picked this muffler due to the center inlet and outlet and the case size being the largest I could reasonably fit in the space that I had. Check out the size difference in the 2 mufflers. If size is any indication of noise level, this should be a step in the right direction:

01cf746d17d2410cce9b72997328e5780602c7fe38.jpg


Before I could install the new muffler I wanted to delete the trailer hitch and rear stock rear bumper in favor of a low profile rear bumper with an integrated rear hitch. I looked at several units and ultimately decided on a Barnes 4wd bumper. After scuffing it with a red scotch brite pad, a few coats of self etching primer and gloss black paint later it was ready to install:

012ef92ba19736dc7b517ed0362749a5cd820ec7ec.jpg


01b7f2ab474f42414159e426fe29a19c9a0b37c342.jpg


The bumper looked great but now the tail pipe and gas tank skid stuck out like a sore thumb. First to fix was the tail pipe. The muffler install went surprisingly smooth – the old muffler and intermediate pipe were removed, intermediate pipe was trimmed down and new muffler was installed in its place. I’ll post a better picture when I can get the TJ up on a lift, but trust me when I say that everything fits snugly in place. Eventually I’d like to re-work the intermediate pipe to fit a little better but it’ll do for now. I wanted the tail pipe tucked up as high as I could possibly get it and after some creativity with the stock exhaust hangers, this was the result:

0183c7579e8cf801303c33efd4d77681e0e73fc492.jpg


Bingo.

The exhaust hangers are temporarily permanent. The mount in front of the axle was clocked 90* to provide the lift that I needed. I’ll drill and tap the second hole and this should work just fine.

019596c03aa98c7997885bea7d290c20810ce95035.jpg


The rear mount is currently sitting like this:

01bbdf0c2ac3958b87650aa2efdefb3b6a5063a64f.jpg


The plan is to swing the factory frame side exhaust hanger forward, use the stock rubber isolator and attach it to a new hanger welded to the tailpipe. Speaking of tailpipe – I plan to either cut the current tip down or weld on a new tip that tucks up closer to the bumper.
Next was to paint the gas tank skid. After a few minutes of prep with the Harbor Freight surface conditioning tool and a few coats of gloss black paint I had the back end of the TJ looking much much better.

0148ef5fc3e28d0ef71481cdaad9f8d91e9e5dd687.jpg


The next items on the list are to add another layer of insulation to the tub and get the A/C operational. I plan to do a detailed post on the A/C setup that I landed on. It's not terribly complicated, but did take a lot of research to finally land on a good solution that didn’t cost a fortune.
 
I’ve neglected updating this thread and am working on updates as there have been quite a few. Enter the last weekend in August and t-minus 4 weeks to get the Jeep road trip (and mild wheeling) ready.

I originally installed Noico 80mil sound and heat deadening mats and the product worked well, but with this TJ being a daily driver I wanted to add another layer of heat and sound insulation to the tub to really get it closer to Cadillac status. I went on Amazon and looked for the cheapest and thickest insulation I could find and landed on this AggSound 157mil Sound Deadner. 1 roll did 98% of the area from the dash to the back of the seats and made a huge difference on the floor temperature and some noticeable sound difference. Yes, this will be a nightmare if I ever get water or mud inside the tub, but we’ll cross that bridge when I get there.

01882f3168c739b1e3a8b01529e9d535f49346af1d.jpg


While I had the interior out it was a good time to actually install the console instead of it just sitting kinda in place. After a lot of in and out and finally cutting out the spare change tray / optional airbag switch, I finally had it bolted in for good. I haven’t figured out what to do with this hole yet, but plan to clean it up and make use of that space.

0147f6be342d3d7300be5dc6d2a1db0c26fa40997a.jpg


Working down my punch list, I finally wired in the trans temp gauge and installed a set of Tuff Country extended brake lines that I got on super clearance from JustDifferentials.com. These brake lines are made by Crown Performance and are great quality.

0177fe6029a6b149d2d04dd1e765f80bc444a32c04.jpg


Nope, still haven’t bought new springs yet.

The TJ was getting due for an oil change and I haven’t been thrilled with the oil pressure with the 10W-30, so I opted to go with Shell Rotella T4 15W-40, a quart of Lucas Oil Stabilizer and of course a Wix filter. I also installed a mechanical oil pressure gauge that is tee’d in with the stock sending unit so I can compare the 2 values. The oil pressure was substantially better after this oil change and the mechanical gauge verified that the stock gauge was within a few PSI.

A fire extinguisher that had been rolling around in the back floor board was finally mounted to the roll bar with a Synergy Mfg. Mount and a few hose clamps. I don’t care if you have a daily driver Prius or a throw down rock bouncer, they all need the correct fire extinguisher and YOU need to know how to use it.

More road trip prep incoming....
 
This is a place holder for an air conditioning tech deep dive.

The short version: I’m using a stock pad mount TJ receiver / drier mounted to the battery tray with a home made bracket, a 96 Dakota line set and some fittings ordered from coldhose.com. I purchased a crimper off eBay that was needed to change a fitting on the Dakota line set and build a custom hose. The A/C has been working fantastic so far.

015dfee9299c1fffebdc7c00c95509c178914f5a23.jpg
 
The first ‘test’ of the TJ was to go on skidder duty at the lake dragging cut trees onto the bank to be cut and hauled off. I loaded up my 5x8 utility trailer with saws, chains and a tools, cranked the A/C up and hit the road. The trailer and contents might have weighed 800# total and the Jeep didn’t even notice it was back there...but the temperature gages told a different story as the water and transmission temp gauge read warmer than usual but not alarmingly high. About 40 miles in the water temperature gaged spiked to 260 and I immediately pulled off the road to see what was the issue. It hadn’t blown a hose, wasn’t puking its guts out and didn’t show any visual signs of being as hot as the gauge showed, so I opted to turn the A/C off and keep moving until I could at least get to the next exit a few miles down the road. Less than a mile later (felt like 150 miles with the temperature gauge pegged), the gauge fell from 240 back to 220 almost instantly. Relief. That lead me to believe there was an air pocket in the cooling system that had collected at the sensor.
The rest of the day went without mechanical issue. I aired down to 15 PSI, bolted the front driveshaft back in and started pulling trees.

01381b4216a23b9dbfe8c906d14d237ad65ee42d76.jpg


Found a soft spot:

011d0ff58d92bcbfc43fb09bde4f436d0ae59b1579.jpg


Then I found a softer spot and made it worse trying to get out:

01496197c7c301569731c04994487bcf8b15bcdacf.jpg


The trip back home was, thankfully, uneventful.

The last few days before we left were spent packing all the little but really important items. Since we’ve never traveled in the TJ I wanted to see how well everything was going to fit in here, so I installed my Motobilt cargo rack and started packing stuff in starting from most important to least. Much to my surprise, there’s a fair amount of room in the back of a TJ with the cargo rack... not saying it will be our new road trip rig, but for 2 people on a 10 day road trip it fit everything we needed.

0168245a5ac88b1324006cc15cf23c8905448766d3_00001.jpg


0171dac5ea001319274543cd5c331e034b68ae2902_00001.jpg


To this point I haven't had a front driveshaft since I don’t have adjustable front control arms to correct the pinion angle. I finally decided to bite the bullet and order Savvy and Core 4x4 front arms to match the rear along with a Barnes 4wd cam bolt eliminator kit. I messed up and ordered the wrong length Core 4x4 arms and was not able to use them on the trip. It is worth noting that the 9/16 bolt included with the Barnes kit is too small for the Johnny Joint included in the Core 4x4 arms and the plates had to be drilled out to accept the larger bolt.

With the Jeep packed and prepped (as it was going to get) it was time to hit the road to Maggie Valley, North Carolina. Keep in mind that the TJ has never left the state and hasn’t done more than 100ish miles in a day up to this point. So let’s go slam 1,000 road miles and a few wheeling miles on it in a week.

Seems fine.
 
Back
Top