Operation 'Basket Case MJ'

I got the final arrangement for front accessories mocked up. I had a 99-01 intake in the parts pile that came with the drive train purchase that matched the PS bracket so I'm swapping over to it. Everything now comes back off for cleaning and painting before install/ final assembly. The belt I used is 74". It's snugged but not all the way tight so it should sit in almost the exact middle of the adjustment range once the belt is tensioned correctly.

IMG_6182.JPG


IMG_6184.JPG
 
Finally got around to dropping the tank and checking the pump and sender. The outside has patches of rust scale that will come off ok but the inside was a pleasant surprise. The sending unit is accurate per my meter and the pump runs well. Not sure if it's a TBI or MPFI pump, as there's no number on it anywhere. Looks new-ish. I'm hoping it's a FI pump since this truck reportedly had a 4.0 in it somewhere in the past before the 2.5 was dropped back in. We'll see. There was about 8.5 gal. of fuel in it that smelled stale but not bad. I pumped it out with the pump in it and put it in my '03 Accord with another 4 gal. of fresh 87 non-E. Easier than trying to dispose of it somewhere.

IMG_6205.JPG


IMG_6222.JPG
 
The vent/ rollover valves were fine and work great. The grommets are cracking and the bottom side of the bed showed a few small spots of evaporated fuel. Found a pair on Amazon for $9. I'm happy not to have to spend close to $350 on a tank and pump/ sender. Looks like the worst that could happen is needing to buy a good quality MPFI pump if this one won't make 39psi.

IMG_6224.JPG
 
The cover on the side of the sender slides off so you can clean the internal elements. Spots of higher than normal resistance indicate buildup of grime. Before cleaning it read 2.4 to 146 ohms with a really big jump between 80 and the upper limit stop. After cleaning it now reads .4 to 91 ohms, very smooth across the sweep/ range. Empty should read as close to 0 as possible because the low fuel light comes on at 5 ohms and turns off above 16.

IMG_6259.JPG
 
Turning attention to the front suspension and axle swap, I noticed this. I'd thought before this rig looked a little higher than stock height. I have ton leafs on the back or a cobbled 5-leaf stack, rear shackles might be longer than stock, hard to tell.

IMG_6292.JPG


The tie rod and steering damper are like 1/8" from each other, not good.

IMG_6325.JPG


Pitman arm is OE 8952000615T. Track bar and drag link also OE. I need to go back and look at the angles. To fix this springs-only lift right it'll need adjustable upper/ lower arms, good adjustable track bar with drop bracket and corresponding drop Pitman arm. It's only 3" but it won't ever be right with just springs. Caster is obviously bad just looking at it.

IMG_6326.JPG


Sway bar fitment is hideous. Those are 8 1/4" links, already longer than stock.

IMG_6328.JPG


Upper spring mounts are trash, picked these up to replace them.

IMG_6329.JPG
 
Scored a sway bar from a 5.2l V8 ZJ this past weekend. I thought for sure it would have a 28mm bar since the VIN lookup on it said it had the SDU heavy duty suspension package. It mic'd at 26mm, still a huge upgrade over the 24mm bar. I did also score ironman4x4fab drop brackets last week. I remembered to get the brackets while I was pulling the bar. Put new bushings in those after cleaning it all up and giving it a fresh coat of DE1634.

IMG_6400.JPG


IMG_6401.JPG


IMG_6402.JPG


IMG_6403.JPG
 
Last edited:
I mocked up the bar and brackets using 8 1/4” XJ/MJ links to get an idea of where I’d land with length requirement on the end links. There are TJ links just like the ZJ ones but an inch longer (9 1/4” vs 8 1/4”). I have a pair of Moog 8 1/4” ZJ links on the way. With the driveline out, I think it looks like I’m right where I’ll want to be once it’s back in and drops the body a couple of inches.

IMG_6406.JPG
 
I have a set of tier 1 adjustable arms from Core 4x4 in Utah on the way. Assessing which adjustable track bar with drop bracket and drop Pitman arm will do what I need and keep angles good. I just want this rig solid, right and reliable, don't need the most expensive parts available.

Core 4x4 arms:

Probably this track bar kit:

Pitman arm possibilities are probably Rough Country 6605, 6610. OE arm has 3.75" total drop, 6605 has 5" total, 6610 has 5.5" total.

IronMan4x4 steering box spacer
(Also considering the steering box brace.

After it's driveable, I may find that 3" lift isn't enough for me lol. 4.5" and above I'd have to go to a longer track bar and Pitman arm and figure out a real lift solution for the rear. Good news is I'm running out of parts to buy to get it on the road at 3" lift, properly done.

Remaining work/ parts:
get front brake parts (calipers, pads, rotors) onto D30
square away front suspension and steering around D30
get the floor pans in
reinstall interior
wire in headlight relays
wire in electric fan
a few sensors
clutch kit, slave, flywheel
 
Front control arms from Core4x4 showed up today. They are VERY stout. Clevite bushings, as advertised. I paid the extra for the hardware kit, glad I did, I'd have paid more trying to gather all that piecemeal.

IMG_6414.JPG


IMG_6416.JPG


IMG_6417.JPG
 
I can't remember the last Saginaw steering gear I redid, but I took a chance on getting this one apart and seeing if it was worth a rebuild. Top plate stamp messed with my head a while, most of the documentation on markings is from the 60s-70s. 7A085 I think means year ending in 7 (1987), A for I don't know what, followed by the Julian date code 085 for March 26th (4 days before my MJ rolled off the line).

This is the nastiest box I've ever personally dealt with:

IMG_6518.JPG


IMG_6519.JPG


IMG_6520.JPG


IMG_6521.JPG
 
I use a rabbit cage bottom pan for disassembly work for stuff like this- available at Tractor Supply/ Agri Supply for $17-25. This is the larger size. Get everything apart, clean parts in a open-top catch pan, clean up the rabbit tray and start going back together (it's cleaner than it looks lol).

IMG_6527.JPG


Taping off in prep for one more external solvent/ brush cleaning and then paint:

IMG_6528.JPG


The ball bearings all looked the same, had to mic them to tell the difference, but once separated into 2 groups I could see the difference.

IMG_6539.JPG
 
I did that once. Rebuilding a box that is. I'd love to find a shop that would do it for a reasonable price.
 
It’s out- now to clean up the frame, engine bay and wheel wells- not going to reuse this axle. Same guy who took the 2.5 engine is coming to get most of the 2WD equipment I'm pulling.

IMG_6567.JPG


The 2” bump stops aren’t horrible but I’m going to replace those with longer ones anyway. The Skyjacker shocks unfortunately are junk. The rears are probably the same way.

IMG_6566.JPG
 
Finally had another XJ show up in the local yard last week. I scored a pair of bumper guards for $20- not perfect but very decent condition and cleaned up nicely. New ones are > $50/pair. I'm in a transient period of limited funding for this project so I'm picking off inexpensive odds and ends and doing mostly labor tasks for now.

IMG_6767.JPG


Also grabbed the underhood light. It's the 2-wire later version. I'll either ground it on the underside of the hood next to the light like early ones or ground it at the fender wall with the relocated blower motor ground. It has a mercury switch in it. I broke it all the way down to clean and test, and then reassembled it.

IMG_6739.JPG


IMG_6740.JPG


IMG_6741.JPG
 
Since I'm not installing a winch (at least for now), I wanted some kind of plate to put on the front bumper. Since front tags aren't issued/ required here in NC, we can put whatever we want on the front. I looked for something with the AMC and/ or Comanche logo but came up dry. Then I saw this plate and thought "why not?" I'll just say this- AMC, Daimler/Chrysler have borrowed the names of 2 Nations and it probably never occurred to them to pay a dime to either one. It just wasn't in the national consciousness then. I think it's entirely ok to give a nod to the people whose name was borrowed to give the MJ a name badge. It is what it is with these vehicles, we can't go back and pretend the SJ/XJ/KJ/KK/KL/MJ/ZJ/WJ/WK/WL are called something else, but a simple acknowledgement seems worthwhile. I wouldn't mind if someone thinks for a moment of the Comanche Nation and wonders how they're doing today.

IMG_6768.JPG
 
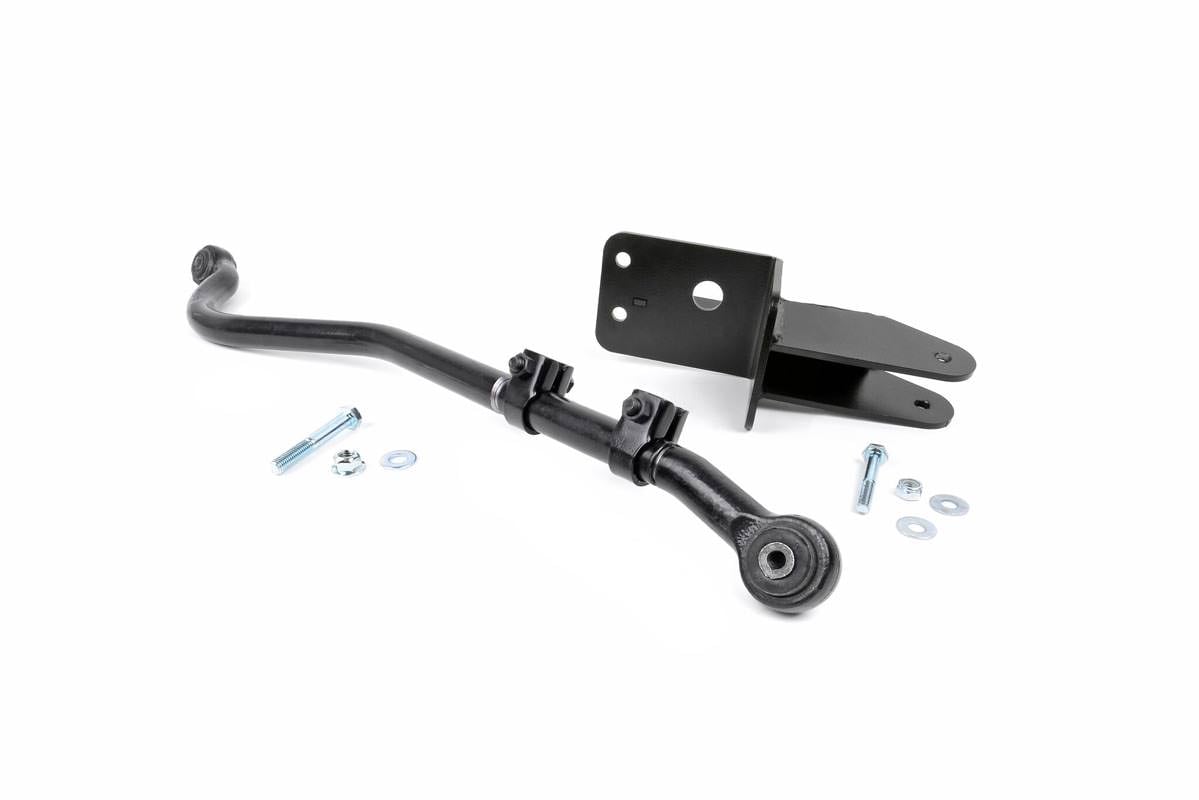
I've gathered a few ancillary parts here and there but I haven't spent any hands-on time since I started job #2 in April. Not a fun stage to be at, interior is ready to reinstall, fuel system is 100% restored, brake system 100% new. Have control arms and full suspension clean and ready. '99 Dana 30 needs a cleaning but it's ready to go under. Main thing is cleaning down to paint/ metal from the front of the frame to the rear of the cab. Address any rust, prime, paint, re-undercoat. Then patch the floors, and everything can start going back together.

So... in the corners at the firewall. I've always thought that's a horrible place to have water and dirt trapped, with all that seam sealer in there. Someone on another forum said maybe drilling a 1/16" hole or two might be good for drainage. Anyway, I wanted to get it all out and see what's what. My feeling is if there were a few small gaps to allow water to drain through, no seam sealer would be needed, with a good coat of primer and top coat of enamel. Assembly plant guys plastered the bottom side, too. I pulled it all out top and bottom. Sure enough, the seam sealer on the bottom creates a reservoir for moisture once the top side loses adhesion after some years.

IMG_7740a.JPG


I pulled the bottom edges out a hair and pushed a couple additional channels with a small punch between the layers for plenty of drainage. Circled in purple above, there is the drain channel that was designed into it, but assembly covered it both sides with seam sealer. This will all be stripped to metal, primed, painted and undercoated again, paying attention to maintain drainage afterward. It'll be behind new fender liners and easy to access, check and maintain as needed. But I think with good coating and easy drainage, rust won't be an issue afterward.

IMG_7722.JPG


I opened up the corner at the right of the channel as well after this pic. Passenger side below- the gaps aren't as large as they look, i backlit it with a really bright LED lamp for the pic.

IMG_7724.JPG
 
Getting there on the driver's side fender well. All the light rust is gone, now seeing the remaining floor pan pin holes better as well. I'll need to trim out a little more.

IMG_8003.JPG


IMG_8004.JPG


The spring tower has a really thick layer of the original undercoating I decided to leave in place, I wire wheeled the surface layer off of it and it's still very thick and somewhat pliable. In the area I got down to paint, everything looks really good and I don't see any benefit to removing the rest of it. I'll feather in the red paint where it's primered and go back with POR-something undercoating in the rest of the wells, with an additional spritz on the old coating left in place.

IMG_8005.JPG


Top rear side of the driver's wheelhouse at the firewall- this is coming along as well. Everything in this corner has been cleaned out, sanded, steel tooth-brushed, hit with acetone and primered. The whole engine bay will be repainted red once everything is cleaned and prepped. Can't wait to post that pic, lol...

IMG_8006.JPG
 
I have a lot of respect for the thoroughness of your process.
Keep sharing :cool:

Much appreciated! It's a sloooow project. But once I get the front frame and engine bay painted it'll pick up speed. Initial progress on the passenger side wheel well:

IMG_8107.JPG
 
Back
Top