Mid-engine Honda Buggy Build, FJ-40 axles

The buggy looks good. Congrats on getting it all finished and running good!

pm sent about the youtube video
 
whats the plan on the driveshaft?,i was "gettin it" across a field and had the same thing happen with the snap ring.
i took the slip out and cleaned all the grease out of it(caused to much suction) and lubed it with WD-40 and so far no issues.
But if theres a better way let me know,i hate to put a 2 piece drive shaft in it.


Also ,mines got a 3.90 gear in it..still crawls good and have not hit top speed yet......im afraid to..LOL they do fly,never boggs down
 
sorry I couldnt stay to watch you race man sorry to hear about the driveshaft!
 
Sorry you had some trouble. Glad you were at least able to run it some.

Here was my plan on the transaxle carrier fix up. What happened to you guys is what I suspected would happen eventually so I had figured out a way around it. I had also spoke to BigJuggys cousin 94s10? ( on Pbb) he's running the Tarsus transaxle buggy. His spud shaft feeds a 2nd tcase so there is no constant pulling on his spud, so his works fine that way.

If you can implement this in the same way or similar with mods will depend on a few variables. Anyway its hard to explain so bear with me.. ( i made a pic to help)
- picture replacing your carrier with a spool and attaching a toyota flange on each end. The flanges come off for case reassembly. The bull gear attaches to the spool.

- For my plan the flanges would be standard toyota 3rd member flanges.
- The ends of the spool rather than be bored and splined internally like a typical spool, would have a external splined section extending out past the bearing mounting area.
- The flange could either be attached via a nut like oem or a hole drilled/tapped for a bolt to be used.
- I was able to source a off the shelf seal that had the correct size OD as well as ID for the toy flange (and correct material, lips etc) But you could resizing the OD of the flange if needed.
- then the driveshafts just run standard toyota ends
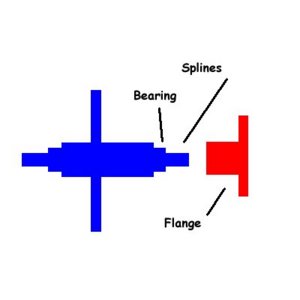
transaxle-spool.jpg
 
After breaking 6 sterring studs on the front axle I am upgrading to 6-shooters and trunnion bearing eliminators from TG, already have one side together. I am also in progress of adding an off-road light bar that is on a hinge so it won't be sticking up in daytime. Will post up pictures tomorrow. Also re-wiring about everything except the engine harness...
 
Pics didn't come as fast as I planned, but here's some updates.

The light bar and gas struts to raise it are mounted. Works pretty nice, no pins to remove or anything, the struts hold it in the down position as well as the raised position. One pushes a little farther than the other (when raised) to cut down on rattles.

Mounted the two fire extinguisher bottles, still need to mount some handheld extinguishers though.
 

Attachments

  • IMG_1765.jpg
    IMG_1765.jpg
    45.8 KB · Views: 1,296
  • IMG_1766.jpg
    IMG_1766.jpg
    37.9 KB · Views: 1,339
  • IMG_1768.jpg
    IMG_1768.jpg
    35.5 KB · Views: 1,334
  • IMG_1769.jpg
    IMG_1769.jpg
    46 KB · Views: 1,336
He's apparently got it put back together, just got this PM from him (hopefully he'll have some pictures to come).

"John Currie could not believe I went everywhere they did without having to winch. Ran sledge hammer, claw hammer, wrecking ball and riffle canyon without a problem"
 
WOW whatta difference!

Yea it's amazing what some nice sheetmetal work can do, I've never been one to take the time with body panels, I know I'm just gonna rip them off... I ripped the driver side panel off the buggy twice at one of the DPG races, once in practice, then again in the race, the rivets didn't like sliding down that rock too much...
 
Back
Top