For you smart creative types: Mounting something flat to cedar lap siding?

Fabrik8

Overcomplicator
Joined
May 27, 2015
Location
Huntersville
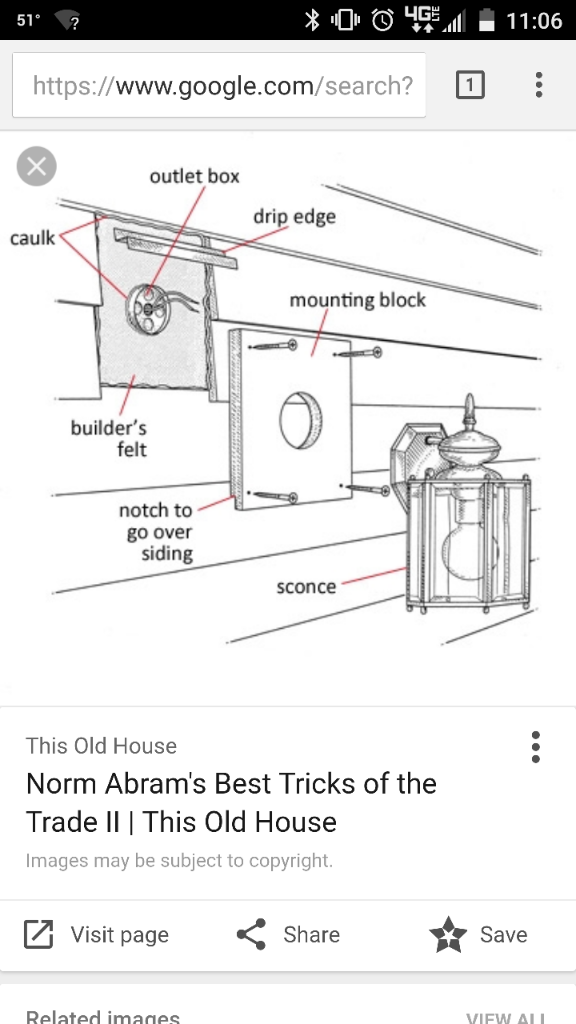
So I need to mount a few new outdoor light fixtures and a wall cap for the range hood to the outside of the house. The siding is painted cedar lap.

I don't want to cut a rectangular hole in the siding down to the sheathing, and then mount a flat plate with flashing, caulk, etc., I know this is the best possible way, but I don't want such a permanent solution for the light fixtures because the light fixture might be completely different in the future. That might be OK for the wall cap, which is unlikely to change in the future.

I know there are a few companies that make surface mount plates with the lap stair-step on the back, but the ones I've seen are either really ugly or not the right size.

I'm thinking about making my own surface mount plate, which would be attached to the siding and caulked, with a hole for the electrical. I would need to make 3 for lights and one for the wall cap, with the lights being 6x12 or 7x16 inches against the siding.

So for you creative types, do have any ideas for materials and processes to make things easy? Being a mechE, my first (overkill) thought is to model the stairstep and footprint in CAD and get a sign shop to 3D-route it on a CNC router out of foam signboard or something. Anyone have a CNC router?

I also thought about making them as shallow trays, with the edges of the trays shaped to match the stairstep. That's a lot of hand work. Maybe start with a solid block, then route out the middle to make the "tray" and then start hand shaping the edges to match the siding. Hand shaping the edges is easier than shaping an entire 6 or 7 inch wide block to match.

I'm probably completely missing the obvious answer, because I've never had to mount something to lap siding before.

Get to thinking!
 
Last edited:
Billet aluminum.

Or a solid chunk of cedar cut to fit.
 
How does one stairstep cut a bigass chunk of cedar to fit, without using a bigass bandsaw?


I don't have a bigass bandsaw. That's a good idea though, I might have to find someone with bandsaw with at least a 6 inch throat.
 
How does one stairstep cut a bigass chunk of cedar to fit, without using a bigass bandsaw?


I don't have a bigass bandsaw. That's a good idea though, I might have to find someone with bandsaw with at least a 6 inch throat.
Chainsaw. Simple procedure. ;)

It wouldn't have to be more than say 8"x8" x2" to accomplish what you need.
 
^that for the light fixtures. My measurement was assuming your range vent is 6" round.
 
Make 4 sides and a cover for that outta 1 by 4 ceder use a scripe to copy the profile of the lap onto the side of the pieces

That was my "tray" idea, simplified (well, maybe) by starting with a solid piece and routing out the middle instead of building up from strips. Think it will work?
 
^that for the light fixtures. My measurement was assuming your range vent is 6" round.

It's for a rectangular cap for 3.25x10 duct. Probably easier to deal with than a 6" round, luckily. We have cathedral ceilings so it has to go right through the wall from the range hood.
 
That was my "tray" idea, simplified (well, maybe) by starting with a solid piece and routing out the middle instead of building up from strips. Think it will work?
It could I would do it the way I said cause I could just use a jig saw to cut the notches and a table saw to cut the pieces down after you cut them to fit the lap
 
You gonna put an electrical box up? I know you said you didn't want to cut out a hole but seems like a 1x8x8 with a electrical box would work best for about any light you ever used. Are the mounting plates 6x12 and 7x16?
 
How much weather/ water will the light fixtures be exposed to? If the lights are covered by the roof overhang you don't to as carefull about flashing or sealing. I would not expect caulking to stop a water leak on a wall especially on separate wood shingles that move around due to moisture and temperature changes. I would prefer a block of wood that could accomadate different size lights with flashing . I like to use copper.
 
You gonna put an electrical box up? I know you said you didn't want to cut out a hole but seems like a 1x8x8 with a electrical box would work best for about any light you ever used. Are the mounting plates 6x12 and 7x16?

The mounting plates are 6x12 and 7x16, yes. There are already electrical boxes for the existing lights, and the existing lights are just flat mounted to the siding without gasketing or anything else. The existing lights have small round bases, and so the light is at an angle because the lap siding is at an angle. Shitty workmanship on that. They've been like that for 26 years, and damn are they ugly.

How much weather/ water will the light fixtures be exposed to? If the lights are covered by the roof overhang you don't to as carefull about flashing or sealing. I would not expect caulking to stop a water leak on a wall especially on separate wood shingles that move around due to moisture and temperature changes. I would prefer a block of wood that could accomadate different size lights with flashing . I like to use copper.

That's what I'm not so sure about, I don't know how much weather they're exposed to. Two of the lights are sheltered somewhat by soffit overhangs, but the overhangs are some distance above the light so they only protect from near-vertical rain. The third light is under a covered porch, so it won't see anything except humidity unless the rain is really driving sideways.

The entire issue is really centered on not wanting to cut out a 6x12 rectangle in the siding to install a flat block with flashing, etc. I will do that if that's the only reliable way to go (I like to do things the proper way), but would like a less permanent solution if possible.

I think I'm going to have to buy a single light, and test it out (and figure out if I really want it) before cutting out big rectangles in the siding.

Any resources on how to properly flash something like this?
 
Lay your rectangle block on siding in plumb position. Hopefully top of block is near bottom of a shingle so flashing could go under shingle above and turn out on top of block. Then cut wedge shape narrow pieces( out of like 3/4 boards) to fit side gaps and across bottom.
 
So I finally have lights on order, because there was a good sale on the parts I wanted, I think 20% off and free shipping. Don't worry about the cost, not important.

So I'm revisiting this. I also bought the range hood too, which should be pretty close to the same mounting and flashing technique for the wall vent.

After looking around at flashing techniques (which is not easy to find details on), I think the best bet is to cut a block the size of the light base, trace it onto the siding, and cut out the siding. Again, fairly big cutouts (6x12 and 7x16) which is why I've scrapped the idea of making something to fit over top of the lap siding, and am going to mount the block flat to the sheathing instead.

Then I need to flash on top of the block, and somehow tape the flashing to the existing membrane or housewrap or whatever scary-ness I find under there. How I do that without removing the siding above the cutout, I don't know. Maybe there's no way around that, but it needs to be done properly.

I also maybe need to flash under the block at the bottom edge as well?

Then I need to caulk the mounting block to the siding on the upper 3 sides, leaving a gap at the bottom (the 4th side) for any moisture to drain.


Am I on the right track?


I really hope I don't find a bunch of rotten siding from 27-ish years of improper installation on the existing lights. At that point I'd just wait until the siding was replaced and get any bad sheathing repaired.
 
Cut a piece of flashing and install it before you put in block put your block in and the caulk. That's about the only way to do it without removing a larger area of siding

Sent from my XT1254 using Tapatalk
 
Can you take a piece of lap siding and mount it backwards and upside down, so that the steps line up and leave a flat surface on the outside?
 
d22b02c0bbd485102c498aa290b23ef8.jpg
. Like this


Sent from my XT1254 using Tapatalk
 
How are you going to use flashing tape under the siding?

That was the part I didn't think could be done without removing siding above the cutout. It's easy enough to slide some Z flashing under the siding (per the picture, etc), but going the extra mile with tape makes it damn near impossible.

Thanks for the picture, it's nice to have a visual that reinforces that (what's in my head) is actually a proper way to do things. I'm less frightened about causing water problems now.


Soooo would that still be proper for something like the vent hood cap that is a full penetration and not just a outlet box?
 
Last edited:
Try not to damage whatever air barrier is behind the siding. Tuck a Z flashing under the siding at the head of the opening and over the new piece. Caulk it in place. Don't worry about getting the Z flashing into/under the air barrier.
 
Try not to damage whatever air barrier is behind the siding.

I think I'm going to slide some sheet metal or old drywall knife or whatever under each piece of siding as a backer and saw stop. I'll probably use a Multi-Max or something similar (for lack of better ideas) to have some easy depth control on the stepped siding and cut crisp corners. It's not my first choice for a tool to do actual work, but the blades are cheap and it should breeze right through aged cedar. Need a proper cutoff saw but don't have a big enough compressor to run one at the moment.
 
Last edited:
You can always cut small first and then open it up to the final dimensions. That would allow you to protect the air barrier at the final cut location as well as repair any damage you do at the first cut.
 
Back
Top