

You are using an out of date browser. It may not display this or other websites correctly.
You should upgrade or use an alternative browser.
You should upgrade or use an alternative browser.
Coronavirus project thread
- Thread starter Blaze
- Start date
kaiser715
Doing hard time
- Joined
- Jun 1, 2006
- Location
- 7, Pocket, NC
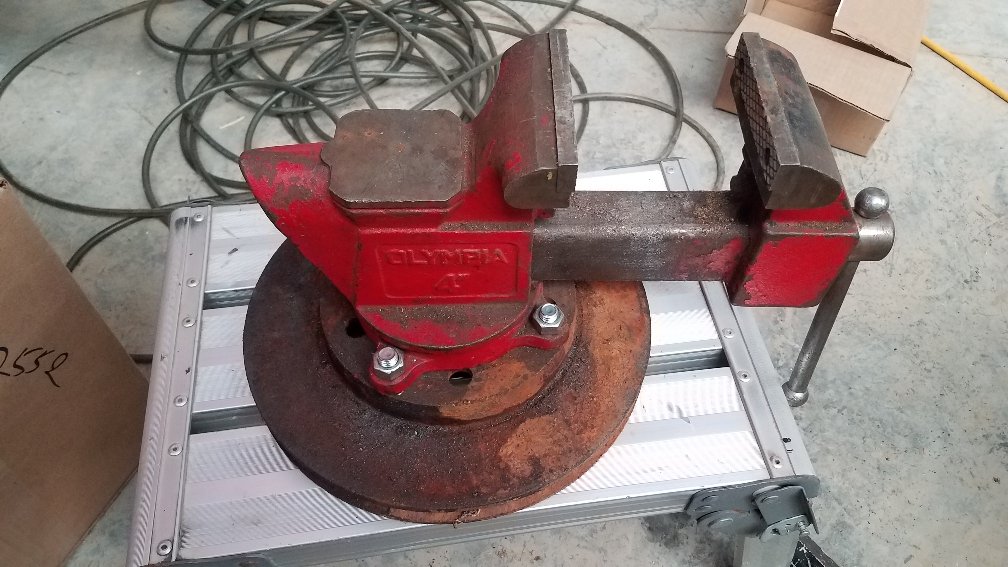
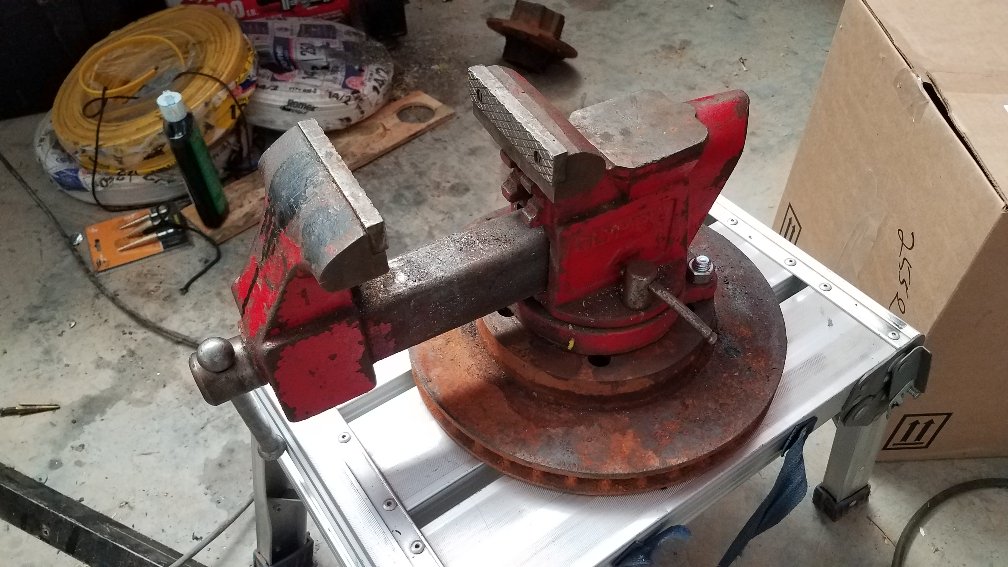
Needed a vise a couple of times recently that is more portable and flexible than the one mounted on a piece of hitch tube, so mounted one to a brake disc today. Enough mass to work on the floor, sitting on the bench, or clamped to the welding table.
Sent from my SM-G930V using Tapatalk
Sent from my SM-G930V using Tapatalk
kaiser715
Doing hard time
- Joined
- Jun 1, 2006
- Location
- 7, Pocket, NC
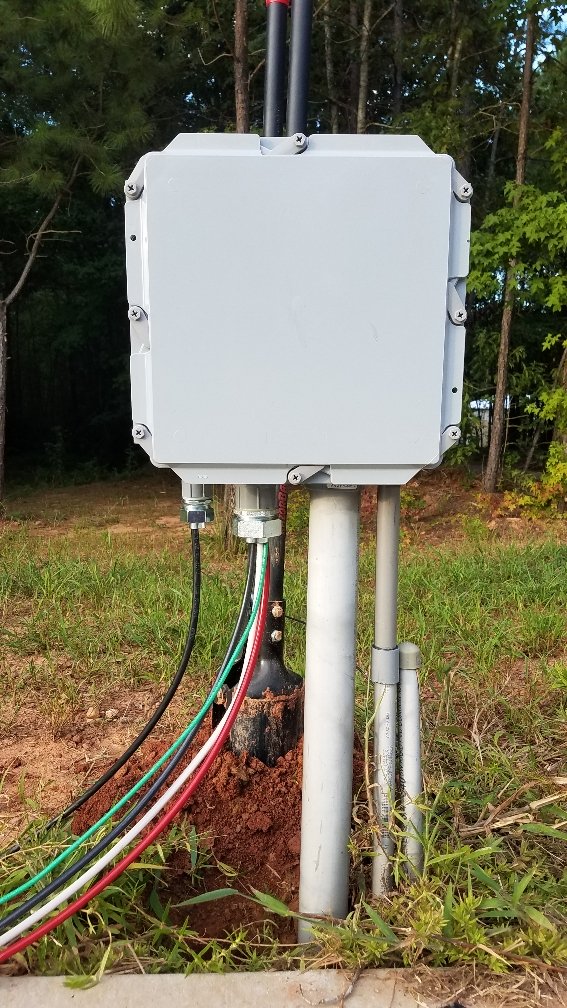
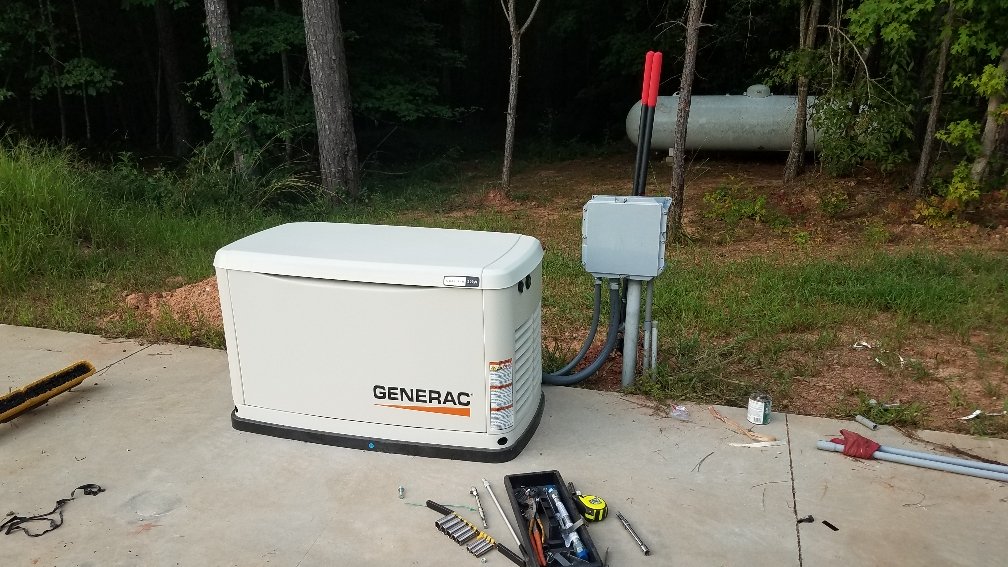
Pulled the wires in for my generator install today. I put in the conduit a couple years ago before I poured the slab for the carport. Today pulled three #3 and one #8 and a 7x#18 tray cable for the control wires. Decided to run up into a 12x12 box, and then out via liquid tight conduit to the generator. Tomorrow I will put in a couple of posts and crossbars to support it rather than letting the conduit hold it up.
The capped off conduit is for a 15-amp circuit for lighting and a 20-amp circuit for outlets under the carport.
Sent from my SM-G930V using Tapatalk
The capped off conduit is for a 15-amp circuit for lighting and a 20-amp circuit for outlets under the carport.
Sent from my SM-G930V using Tapatalk
Last edited:
Lurch830
messin' with sasquatch
- Joined
- Mar 1, 2007
- Location
- Wilton, NC
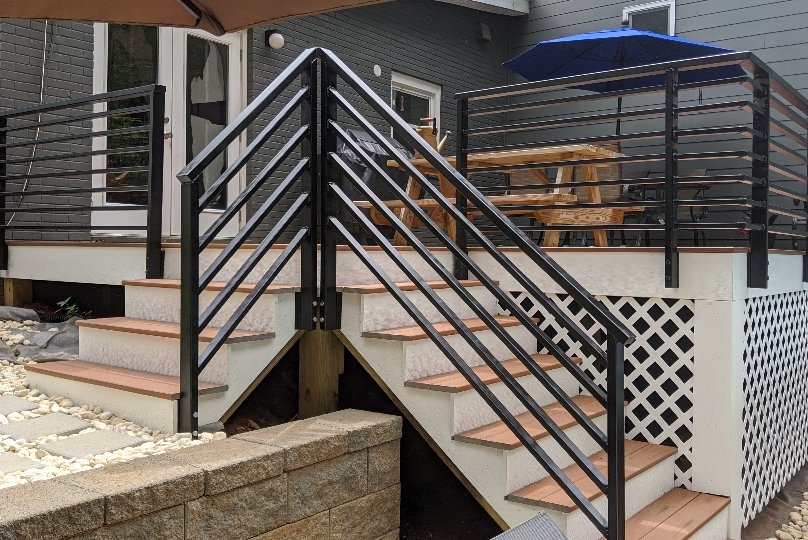
If the pool cover didn't have any wrinkles I'd say that was a rendering!Finally done.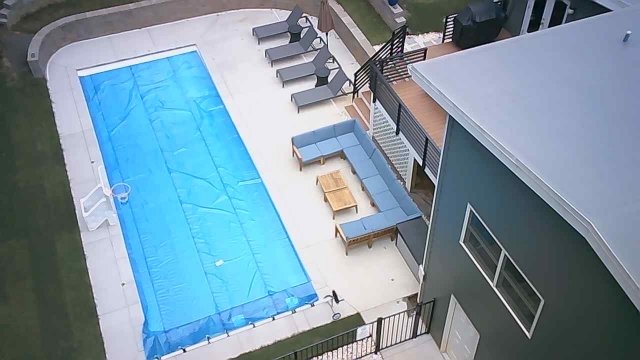
Lurch830
messin' with sasquatch
- Joined
- Mar 1, 2007
- Location
- Wilton, NC
Kudos to you for going with the graybar/grainger enclosure...had about 800 in my garage at one point! The same size from HD/Lowes will leak within 6 months!
Sent from my SM-G930V using Tapatalk
kaiser715
Doing hard time
- Joined
- Jun 1, 2006
- Location
- 7, Pocket, NC
Kudos to you for going with the graybar/grainger enclosure...had about 800 in my garage at one point! The same size from HD/Lowes will leak within 6 months!
Got that from our local electric supply house. Got my MHF for the shop run from them earlier in the year, and found out (after that purchase) that I knew one of the salesmen from way back. Said to see him next time and he'd hook me up with contractor pricing. He worked at it, said he got it down to about the same has their high-volume electrician customers. Pricing was still pretty stiff -- could have done better on mail order and/or Lowes on much of it. Wire was about (several 500' spools of 14 and 12 THHN) was about 10% more than ordering and shipping from wireandcableyourway.
On the plastics, I do wonder how the quality compares, though. I went to Lowes (or maybe it was HD) and picked up some LB's for the other end of those 3 conduit runs, and they have, in two years, discolored from the sun pretty bad. One side went chalky white, the top and other side of them is dark and burnt looking. Don't know how the supply house ones would compare. Can't replace now....I'll just hide them behind a bush when I do the landscaping.
Most of the genset installs I looked at on youtube they just typically stubbed up the conduits for the load and control wires, and glued on a female adapter, then straight to liquid tight for the run to the generator. Some shot straight up, some used an LB there. I decided by using the box, although it cost more, would give me a little bit of wiggle room with the wire and look a little nicer. Since I'm using THHN for the load cables, I am also using liquid tight running about 5' in the crawl space from where the conduit enters over to the backside of the Generac panel.
awheelterd
Well-Known Member
- Joined
- Oct 18, 2007
- Location
- Kenly, NC
Check out automation direct for boxes next time you need one. Way cheaper than supply house boxes.Got that from our local electric supply house. Got my MHF for the shop run from them earlier in the year, and found out (after that purchase) that I knew one of the salesmen from way back. Said to see him next time and he'd hook me up with contractor pricing. He worked at it, said he got it down to about the same has their high-volume electrician customers. Pricing was still pretty stiff -- could have done better on mail order and/or Lowes on much of it. Wire was about (several 500' spools of 14 and 12 THHN) was about 10% more than ordering and shipping from wireandcableyourway.
On the plastics, I do wonder how the quality compares, though. I went to Lowes (or maybe it was HD) and picked up some LB's for the other end of those 3 conduit runs, and they have, in two years, discolored from the sun pretty bad. One side went chalky white, the top and other side of them is dark and burnt looking. Don't know how the supply house ones would compare. Can't replace now....I'll just hide them behind a bush when I do the landscaping.
Most of the genset installs I looked at on youtube they just typically stubbed up the conduits for the load and control wires, and glued on a female adapter, then straight to liquid tight for the run to the generator. Some shot straight up, some used an LB there. I decided by using the box, although it cost more, would give me a little bit of wiggle room with the wire and look a little nicer. Since I'm using THHN for the load cables, I am also using liquid tight running about 5' in the crawl space from where the conduit enters over to the backside of the Generac panel.
kaiser715
Doing hard time
- Joined
- Jun 1, 2006
- Location
- 7, Pocket, NC
Kudos to you for going with the graybar/grainger enclosure...had about 800 in my garage at one point! The same size from HD/Lowes will leak within 6 months!
Soooo.....did I get the orientation of the box right?
Thought I did good....looked at the outside of the lid, there was writing stamped along the bottom edge of the front side, so I positioned the box so it would be right side up when the lid was mounted. Then, drilled the holes in the box. THEN, saw that there was embossed writing in the bottom of the carcass, oriented 90 degress to the emboss on the lid.
Is there a right/wrong orientation on these? Or am I just being my usual anal-retentive self?
Lurch830
messin' with sasquatch
- Joined
- Mar 1, 2007
- Location
- Wilton, NC
I'd say you're being anal. I used to put mine the other way so I can use meter seals as a hinge (small holes @ the 4 & 10 o' clock in your pic), downside to that orientation if its mounted on a flat surface (bldg, gen enclosure, padmount xfrmr) water can pool in those ridges. Your orientation doesn't let water pool (what I do now), but you don't have the benefit of making your own hinge (most likely won't need).Soooo.....did I get the orientation of the box right?
Thought I did good....looked at the outside of the lid, there was writing stamped along the bottom edge of the front side, so I positioned the box so it would be right side up when the lid was mounted. Then, drilled the holes in the box. THEN, saw that there was embossed writing in the bottom of the carcass, oriented 90 degress to the emboss on the lid.
Is there a right/wrong orientation on these? Or am I just being my usual anal-retentive self?
kaiser715
Doing hard time
- Joined
- Jun 1, 2006
- Location
- 7, Pocket, NC
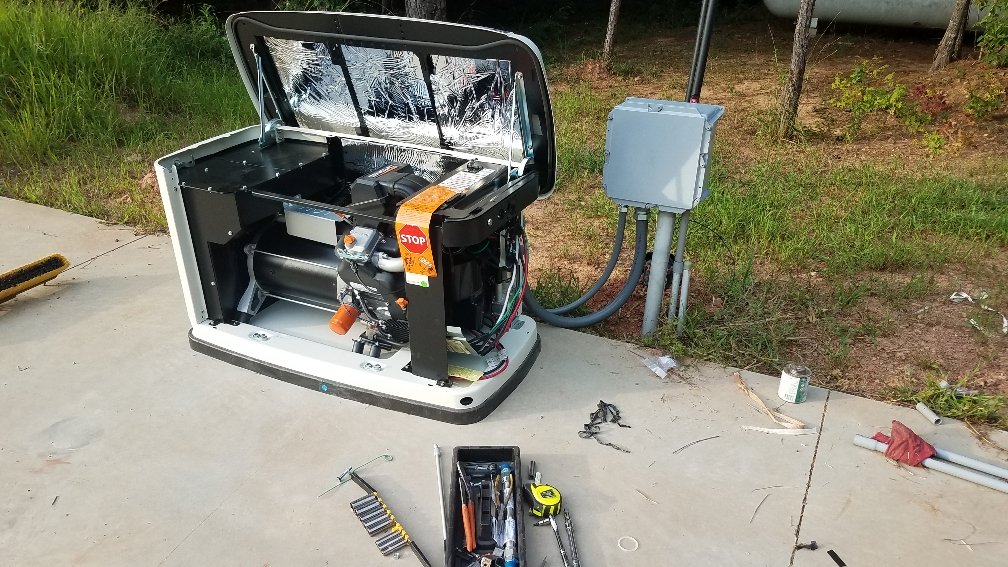
Got the generator in place, bolted down, and wired up at one end. Also tied into the house alarm in case the looters and rioters come by.
Sent from my SM-G930V using Tapatalk
Sent from my SM-G930V using Tapatalk
kaiser715
Doing hard time
- Joined
- Jun 1, 2006
- Location
- 7, Pocket, NC
Two nitpicks on the Generac install. You'd think for 5k they'd think these things out a little better...
1) There are two knockouts on the back panel, 1-1/4 for the load wires, and 3/4 for the control wires. I used liquid tight from the junction box to the generator for both. At the generator end, I used a 90 degree liquid tight fitting pointing straight down. But...then see that in that position the 3/4 conduit half covers the port where the gas line goes in. So, they both have to angle to the side a bit. Surely they could have moved one or the other an inch to the side.
2) It has 3 mounting holes to bolt down to the slab. The generator base is 4" thick (2" plastic base, 2" of metal frame and bottom pan), so you can't use an ordinary red-head anchor. Holes are 3/8, and instructions say to use 3/8 bolts or lags. I was going to use lead lag shields, but was out of 3/8 and lowes doesn't carry them anymore (even though they are still on the website). I did have some hammer in female anchors (like these: Red Head Drop-In Anchors}. The shipping cardboard cover had a template for placing the holes, and I marked and drilled as accurately as you can with a hammer drill and 1/2" bit. Set the generator in position, and have to wiggle it around a lot because the 4" deep holes that the bolts drop thru are pretty much just a hair more than 3/8, the size of the bolt required. So, there is no wiggle room at all. The front two holes were perfect, once I got the generator aligned, but the back hole misses by maybe 1/16 of an inch. Grrrrrrrrrrr. I'm either going to ream out the hole in the generator base with a 1/2 or 9/16 bit, or taper the end of the bolt a bit on the grinder so hopefully can give it a tap and get the threads to link up.
kaiser715
Doing hard time
- Joined
- Jun 1, 2006
- Location
- 7, Pocket, NC
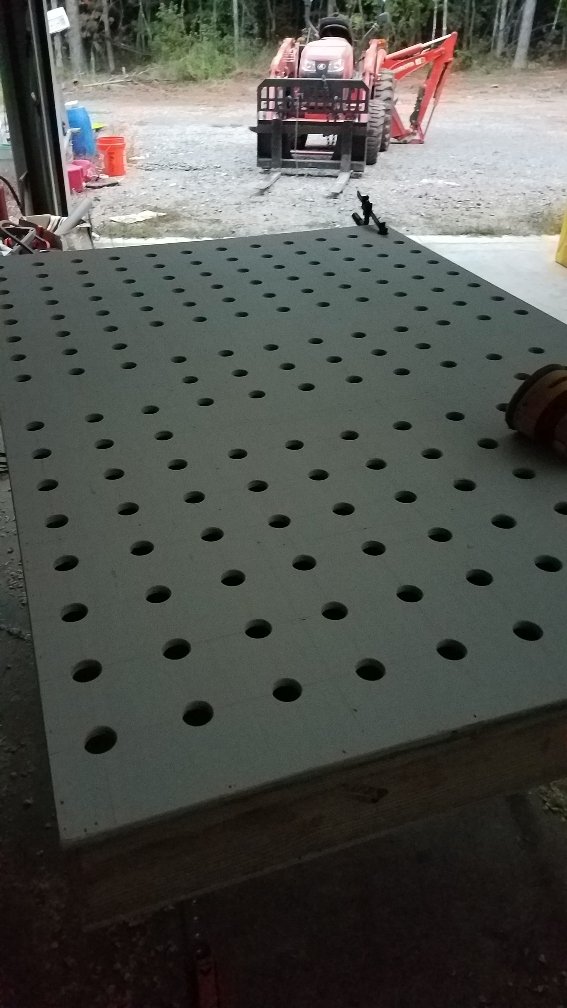
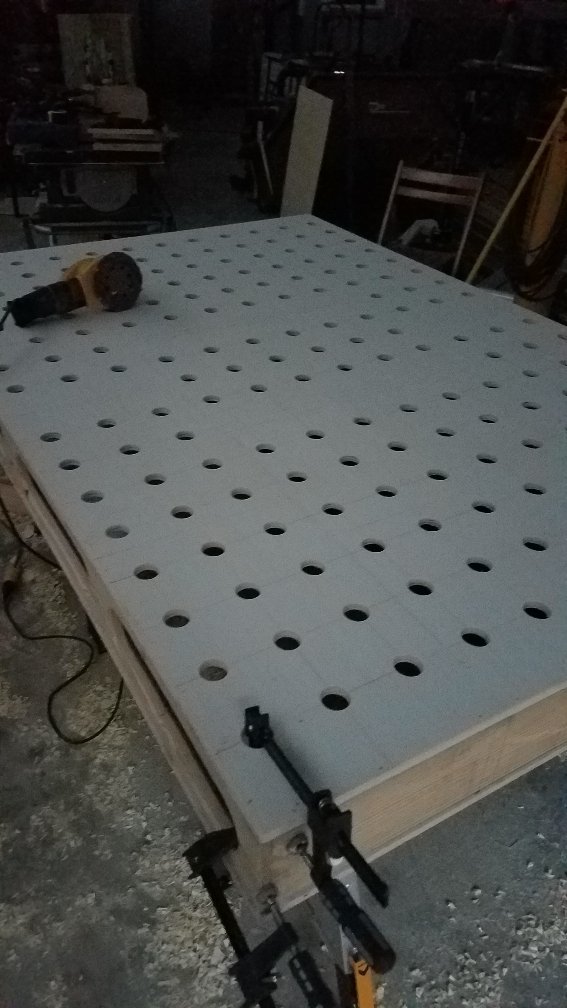
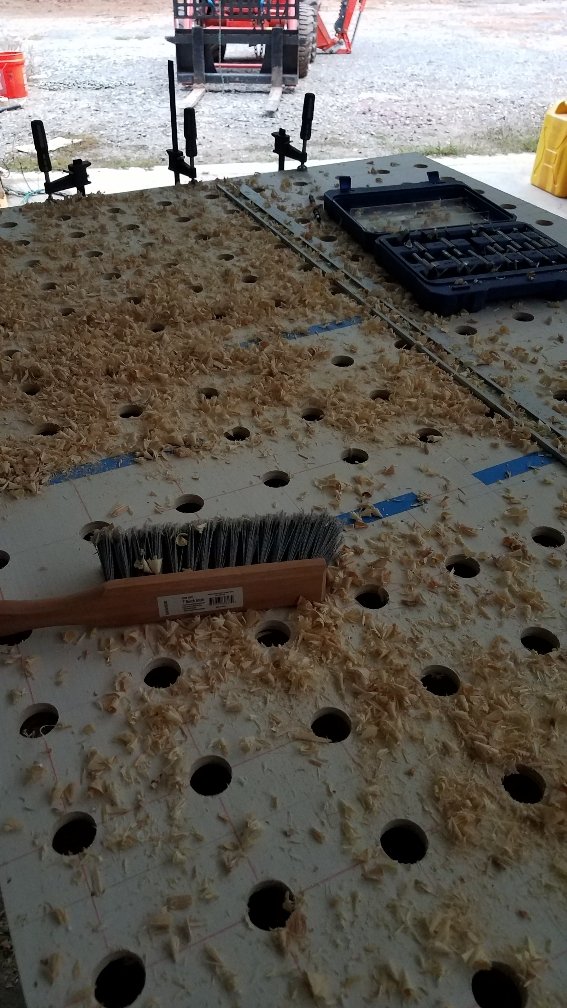
Built an assembly table for woodworking projects. Torsion box design, 1/2 plywood both sides, web of 1x6 SYP for the frame.
174 holes on 4" centers on one side, 1-1/4" for clamping.
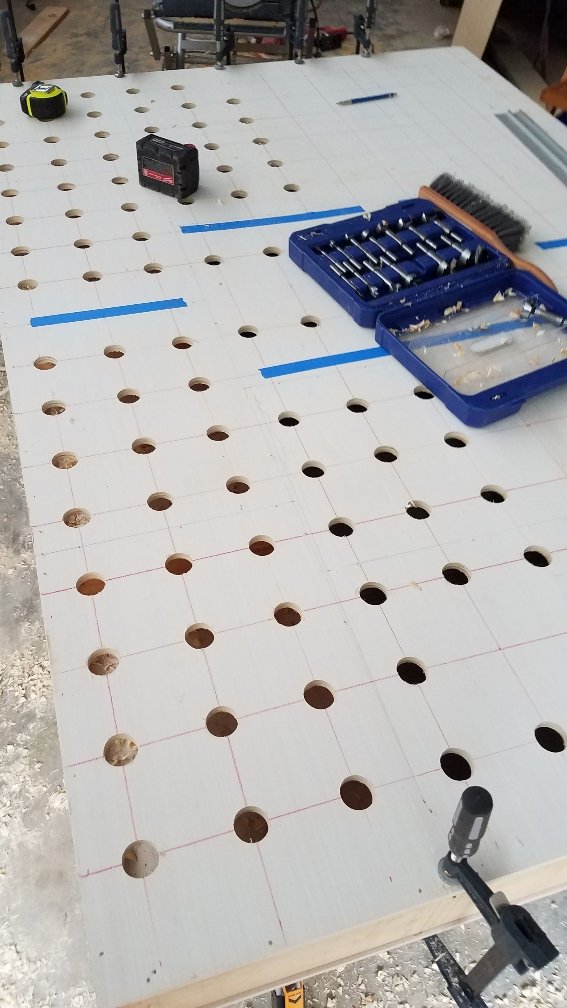
Sent from my SM-G930V using Tapatalk
174 holes on 4" centers on one side, 1-1/4" for clamping.
Sent from my SM-G930V using Tapatalk
kaiser715
Doing hard time
- Joined
- Jun 1, 2006
- Location
- 7, Pocket, NC
It's pretty dang flat. Flashlight behind a straight edge:
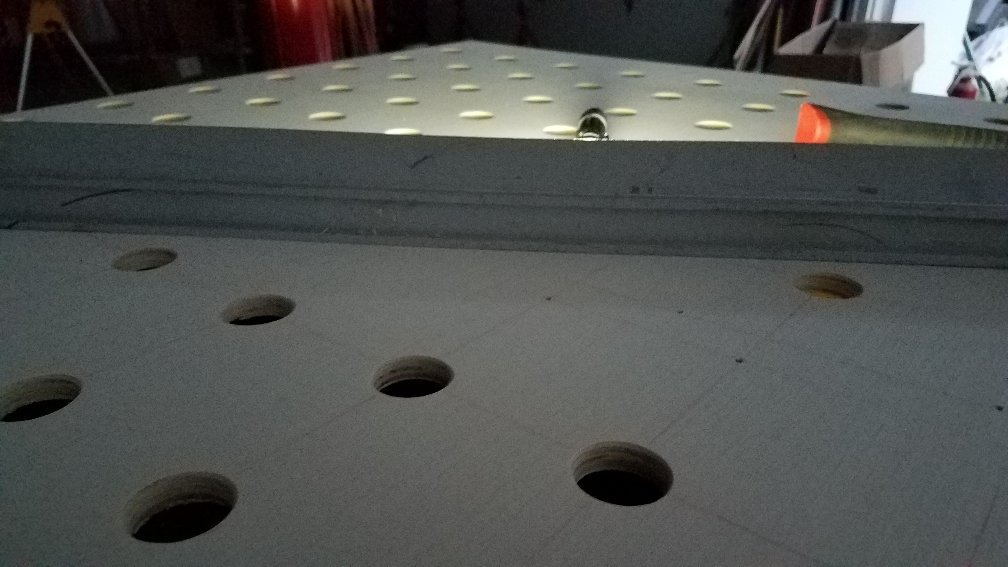
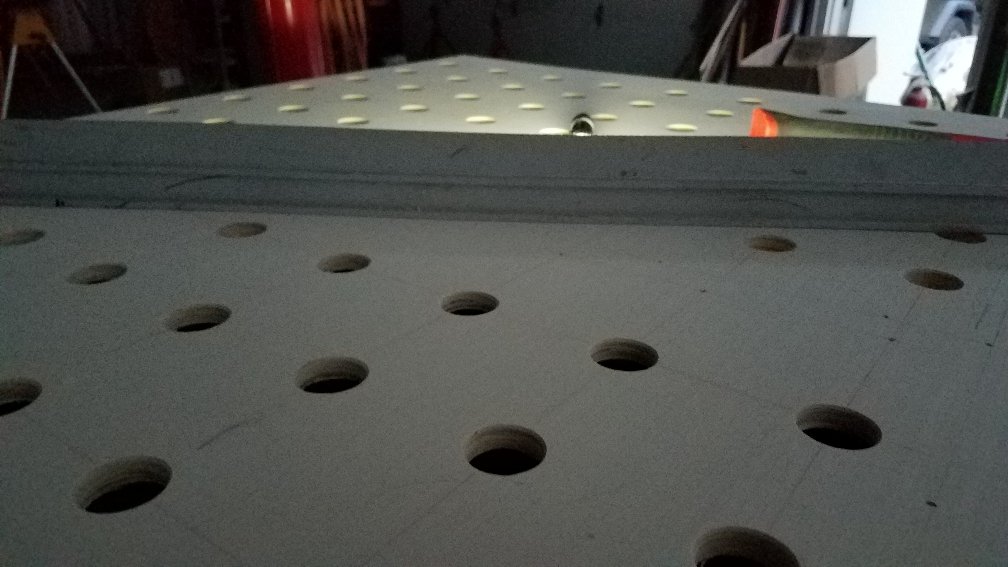
Sent from my SM-G930V using Tapatalk
Sent from my SM-G930V using Tapatalk
Fabrik8
Overcomplicator
- Joined
- May 27, 2015
- Location
- Huntersville
Built an assembly table for woodworking projects. Torsion box design, 1/2 plywood both sides, web of 1x6 SYP for the frame.
174 holes on 4" centers on one side, 1-1/4" for clamping.
Sent from my SM-G930V using Tapatalk
Why not do 3/4" dog holes to accept the tons of different clamp/fixture accessories for woodworking? That's the super common size, other than the 20mm dog holes for Festool accessories which are less common.
kaiser715
Doing hard time
- Joined
- Jun 1, 2006
- Location
- 7, Pocket, NC
Why not do 3/4" dog holes to accept the tons of different clamp/fixture accessories for woodworking? That's the super common size, other than the 20mm dog holes for Festool accessories which are less common.
I got a bunch of clamps that would angle down thru a 1.25 hole, but not smaller. Ain't going to buy more clamps just to fit a 3/4 hole. Going to make some cookies for sawing, will use some 1-1/4 oak dowel I already got.
It'll work fine for me.
kaiser715
Doing hard time
- Joined
- Jun 1, 2006
- Location
- 7, Pocket, NC
Trying to figure out what to do to keep glue from sticking to it so bad. From what I have been reading, I am thinking a couple of coats of shellac, followed by a couple coats of Johnson's paste wax.
Anybody know something that works better?
Anybody know something that works better?
Fabrik8
Overcomplicator
- Joined
- May 27, 2015
- Location
- Huntersville
Anybody know something that works better?
Making it out of melamine plywood, or laminating Formica on it like a countertop..
")
Any hard coating that is able to get a gloss finish without a lot of surface texture will work fine, then some wax. I've never used Johnson's wax, but I've heard it tossed around for making glue not stick to wood. If you want to get rowdy, get some proper mold release wax like Honey Wax or Meguiar's (their mold release wax, not their car wax). Build up a few coats.
I think Watco makes a few things that may work as well (Satin Wax?) and may be a one-stop solution instead of a separate coating and a wax.
Depends on the type of glue you're planning on using though. Standard wood glue doesn't need much help to not stick to things..
Last edited:
kaiser715
Doing hard time
- Joined
- Jun 1, 2006
- Location
- 7, Pocket, NC
Got some more downspouts plumbed away
from the house today. S&D thinwall under grass, schedule 40 under the gravel.

The long run in the pic crossed over two power lines. Service entrance into the house panel, and MHF running to the shop. I was there when the utility service went in, it was a good 3.5 feet down when it went in. My shop feed that I put in was 4' deep at that area. My drain trench was only 18" deep. Still....it gets your attention quick when you pull a piece of this up with the bucket (once for each line):

I did use my cable locator on both lines. The tape for the shop line I put in was dead over the wire. The power company line, we hit the tape about 2' (horizontal distance) from where the line was.
from the house today. S&D thinwall under grass, schedule 40 under the gravel.
The long run in the pic crossed over two power lines. Service entrance into the house panel, and MHF running to the shop. I was there when the utility service went in, it was a good 3.5 feet down when it went in. My shop feed that I put in was 4' deep at that area. My drain trench was only 18" deep. Still....it gets your attention quick when you pull a piece of this up with the bucket (once for each line):
I did use my cable locator on both lines. The tape for the shop line I put in was dead over the wire. The power company line, we hit the tape about 2' (horizontal distance) from where the line was.
Last edited:
89wrangler
Not a new member
- Joined
- Oct 22, 2005
- Location
- Bostic,NC
Finally bit the bullet and ordered my shed kit before the prices climb anymore  . Would have saved almost $500 if I would have ordered in April like I should have. Going to be a 16 x 40 to park the RV under and will add and 12 x 40 lean to next year.
First step was to clear a spot which meant a days worth of work moving shit and junk around ( tires, axles, wheels, freaking tires, golf cart, AC units JUNK)
This was the result of that

Next was to get rid of the leaves a few trees and some leaning limbs (which I had to call a bucket truck in to get due to the height of them) and do some grading and stake it off

After that was to square things up and make were the footers we to be.

Then to dig 10 of those damn footers. I ain't no young man anymore. Man that sucked. And yes I know that pole is too short.

Got footer inspection this morning so tomorrow I will mixing and pouring concrete and hard part will be done. More to follow unless I kill over or something.
. Would have saved almost $500 if I would have ordered in April like I should have. Going to be a 16 x 40 to park the RV under and will add and 12 x 40 lean to next year.First step was to clear a spot which meant a days worth of work moving shit and junk around ( tires, axles, wheels, freaking tires, golf cart, AC units JUNK)
This was the result of that
Next was to get rid of the leaves a few trees and some leaning limbs (which I had to call a bucket truck in to get due to the height of them) and do some grading and stake it off
After that was to square things up and make were the footers we to be.
Then to dig 10 of those damn footers. I ain't no young man anymore. Man that sucked. And yes I know that pole is too short.
Got footer inspection this morning so tomorrow I will mixing and pouring concrete and hard part will be done. More to follow unless I kill over or something.
jcramsey
Well-Known Member
- Joined
- Jul 22, 2009
- Location
- Marion, NC
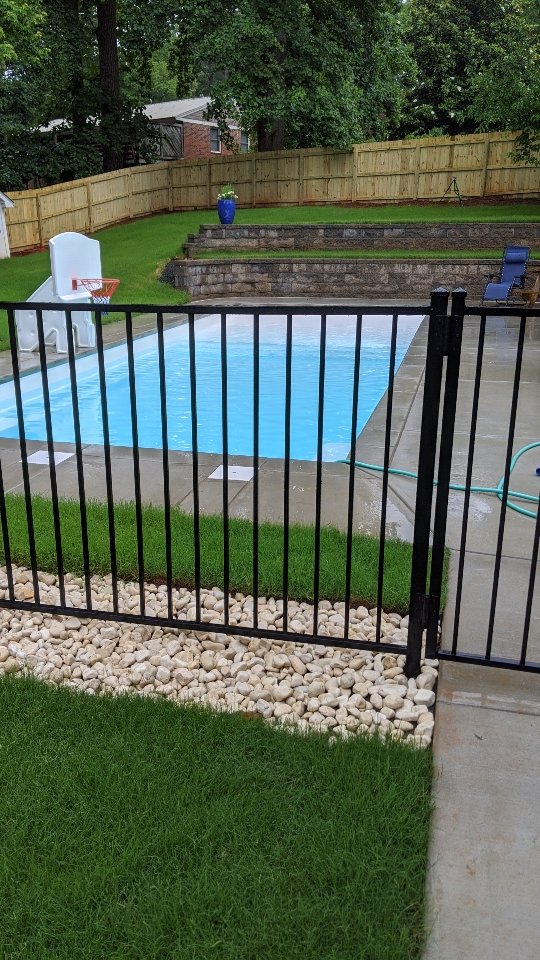
Well I started this on March 9th and I am finally getting close to completion
Still lots more work but it is all coming together.

Late post...but Momma wants a pool when we move. Did you do all the work on yours or sub some of it out?
Used a company but won't post there name as I was not happy with them.Late post...but Momma wants a pool when we move. Did you do all the work on yours or sub some of it out?
I did move the dirt and lots of other parts but they dug hole and put the pool in and ran the plumbing
jcramsey
Well-Known Member
- Joined
- Jul 22, 2009
- Location
- Marion, NC
Used a company but won't post there name as I was not happy with them.
I did move the dirt and lots of other parts but they dug hole and put the pool in and ran the plumbing
Thanks....I’ve got some research to do. Was hoping you did it yourself and it was no sweat

I can give you lots of info and things you can do or should not. Etc. Send me a messageThanks....I’ve got some research to do. Was hoping you did it yourself and it was no sweat